Introduction to Floral Butter Cookies with Royal Icing
What Makes Floral Butter Cookies Special?
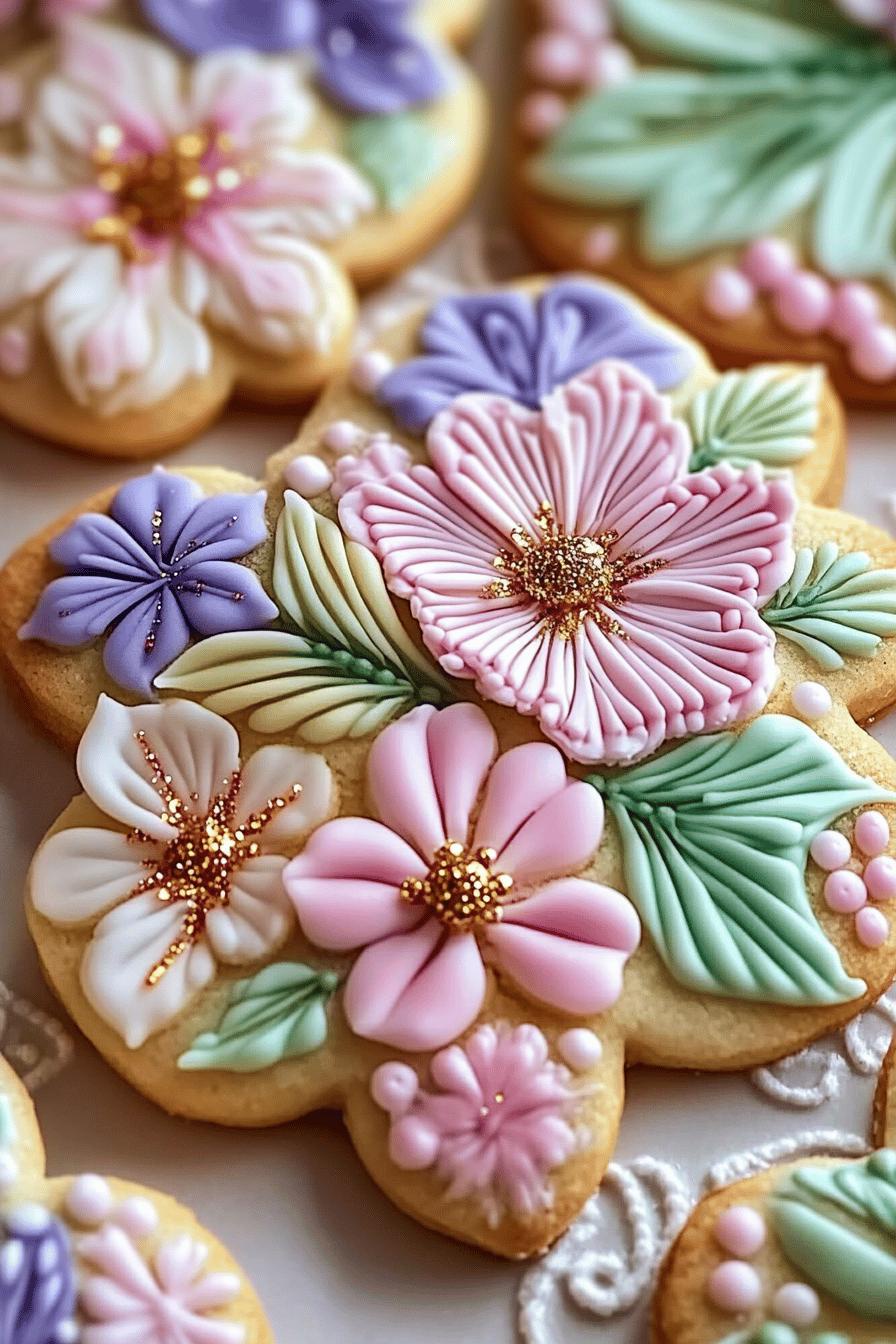
Floral Butter Cookies with Royal Icing are not just any ordinary cookies. They are a delightful blend of rich, buttery flavor and artistic decoration. The cookies are soft yet crisp, making each bite a heavenly experience. What truly sets them apart is the royal icing. This icing is smooth, shiny, and can be easily colored to match any theme. The floral designs add a touch of elegance, making these cookies a feast for the eyes as well as the palate. Whether you’re a beginner or an experienced baker, these cookies are simple to make and incredibly rewarding.
The Perfect Treat for Any Occasion
These cookies are versatile and perfect for any celebration. Whether it’s a birthday party, a wedding, or a holiday gathering, Floral Butter Cookies with Royal Icing fit right in. Their beautiful designs can be customized to suit the occasion, making them a thoughtful gift or a delightful addition to dessert tables. Plus, they are easy to transport, so you can share them with friends and family. With their charming appearance and delicious taste, these cookies are sure to impress everyone!
Ingredients for Floral Butter Cookies with Royal Icing
To create these delightful Floral Butter Cookies with Royal Icing, you will need a few simple ingredients. Each component plays a vital role in achieving the perfect texture and flavor. Here’s what you’ll need:
- For the Cookies:
- 2 ¾ cups all-purpose flour
- 1 cup unsalted butter, softened
- ¾ cup granulated sugar
- 1 large egg
- 1 teaspoon vanilla extract
- ½ teaspoon almond extract (optional)
- ½ teaspoon salt
- 1 teaspoon baking powder
- For the Royal Icing:
- 3 egg whites (or 4 tablespoons meringue powder)
- 4 cups powdered sugar, sifted
- 1 teaspoon lemon juice or vanilla extract
- Food coloring (optional, for decorating)
These ingredients are easy to find and will help you create cookies that are not only delicious but also visually stunning. Make sure to gather everything before you start baking, as this will make the process smoother and more enjoyable!
Step-by-Step Preparation of Floral Butter Cookies with Royal Icing
Step 1: Preparing the Cookie Dough
To start, you’ll want to prepare the cookie dough. Begin by creaming the softened butter and granulated sugar together in a large mixing bowl. Use an electric mixer on medium speed for about 2-3 minutes until the mixture is light and fluffy. Next, add the egg, vanilla extract, and almond extract (if using). Mix until everything is well combined.
In a separate bowl, whisk together the all-purpose flour, baking powder, and salt. Gradually add this dry mixture to the wet ingredients. Mix on low speed until the dough comes together. It should be soft but not sticky. If it feels too sticky, add a little more flour, one tablespoon at a time. Once ready, wrap the dough in plastic wrap and refrigerate for at least 1 hour. This chilling step is crucial as it helps the cookies maintain their shape while baking.
Step 2: Shaping the Cookies
After the dough has chilled, it’s time to shape your cookies. Preheat your oven to 350°F (175°C). On a lightly floured surface, roll out the dough to about ¼ inch thick. Use cookie cutters to cut out your desired shapes. Floral shapes work beautifully for this recipe, but feel free to get creative!
Place the cut-out cookies on a baking sheet lined with parchment paper. Make sure to leave some space between each cookie, as they will spread slightly while baking. If you want to add a little flair, you can use a toothpick to create designs or patterns on the surface of the cookies before baking.
Step 3: Baking the Cookies
Now it’s time to bake! Place the baking sheet in the preheated oven and bake for 8-10 minutes. Keep an eye on them; you want the edges to be lightly golden but the centers should remain pale. Once baked, remove the cookies from the oven and let them cool on the baking sheet for a few minutes. Then, transfer them to a wire rack to cool completely. This cooling step is important, as it ensures the cookies are firm enough to hold the royal icing.
Step 4: Making the Royal Icing
While the cookies are cooling, you can prepare the royal icing. In a clean mixing bowl, beat the egg whites until they are frothy. Gradually add the sifted powdered sugar, mixing on low speed until combined. Once mixed, increase the speed to medium and beat until the icing forms stiff peaks. This should take about 5-7 minutes. If you want to add flavor, mix in the lemon juice or vanilla extract at this stage.
If you plan to use food coloring, divide the icing into separate bowls and add your desired colors. Mix well until you achieve the desired shade. Remember, royal icing dries quickly, so cover any unused icing with a damp cloth to prevent it from hardening.
Step 5: Decorating the Cookies with Royal Icing
Now comes the fun part—decorating! Once the cookies are completely cool, use a piping bag fitted with a small round tip to outline the edges of each cookie with royal icing. After outlining, fill in the center with more icing, using a toothpick to spread it evenly. You can create beautiful floral designs by piping additional icing on top or using a toothpick to swirl colors together.
Let the decorated cookies sit at room temperature for several hours or overnight to allow the icing to harden completely. Once set, your Floral Butter Cookies with Royal Icing are ready to be enjoyed or gifted!
Variations of Floral Butter Cookies with Royal Icing
Flavor Variations
While the classic Floral Butter Cookies with Royal Icing are delicious as is, you can easily switch things up with different flavors. Here are some fun ideas to consider:
- Citrus Zest: Add the zest of lemon, lime, or orange to the dough for a refreshing twist. This bright flavor pairs wonderfully with the sweetness of the royal icing.
- Chocolate Chip: Mix in mini chocolate chips to the dough for a delightful surprise in every bite. The chocolate adds richness that complements the buttery base.
- Spices: Incorporate spices like cinnamon or nutmeg for a warm, cozy flavor. This is especially nice during the fall and winter months.
- Nut Flavors: Use almond or hazelnut extract instead of vanilla for a nutty flavor. This adds depth and a unique taste to your cookies.
Feel free to experiment with these variations to find your favorite flavor combination. Each twist will make your Floral Butter Cookies even more special!
Decorating Ideas
Decorating your Floral Butter Cookies with Royal Icing can be a creative and enjoyable process. Here are some ideas to inspire your designs:
- Ombre Effect: Create a beautiful ombre effect by gradually mixing in more food coloring to your royal icing. Start with a light shade and work your way to a darker hue.
- Floral Patterns: Use different piping tips to create various flower designs. Think daisies, roses, or even simple dots that resemble petals.
- Gold or Silver Accents: Add a touch of elegance by using edible gold or silver dust to highlight certain areas of your cookies. This will make them shine and look extra special.
- Personalized Messages: Write names or short messages on the cookies for special occasions. This adds a personal touch that friends and family will love.
Let your imagination run wild! The decorating possibilities are endless, and each cookie can be a unique work of art.
Cooking Note for Floral Butter Cookies with Royal Icing
When baking Floral Butter Cookies with Royal Icing, a few key points can help ensure your cookies turn out perfectly every time. First, always use room temperature ingredients. This means letting your butter and eggs sit out for about 30 minutes before you start. Room temperature ingredients mix more easily, leading to a smoother dough and better texture.
Next, be mindful of your oven temperature. Ovens can vary, so it’s a good idea to use an oven thermometer to check that it’s accurate. Baking at the right temperature is crucial for achieving the perfect cookie texture. If your cookies are browning too quickly, consider lowering the temperature slightly.
Additionally, when rolling out your dough, use a light dusting of flour on your work surface and rolling pin. This prevents the dough from sticking and helps maintain its shape. If the dough becomes too warm while you’re working with it, pop it back in the fridge for a few minutes. Chilled dough is easier to handle and will hold its shape better during baking.
Lastly, patience is key when it comes to decorating with royal icing. Allow the cookies to cool completely before icing them. This prevents the icing from melting and losing its shape. After decorating, let the cookies sit undisturbed for several hours or overnight. This ensures the royal icing hardens properly, making your cookies not only beautiful but also easy to handle.
By following these cooking notes, you’ll create stunning Floral Butter Cookies with Royal Icing that are sure to impress everyone!
Serving Suggestions for Floral Butter Cookies with Royal Icing
Once your Floral Butter Cookies with Royal Icing are beautifully decorated and ready to enjoy, it’s time to think about how to serve them. These cookies are not only delicious but also visually appealing, making them perfect for various occasions. Here are some delightful serving suggestions:
- Cookie Platters: Arrange your cookies on a decorative platter. Mix different shapes and designs for a colorful display. This is perfect for parties or gatherings, allowing guests to admire and choose their favorites.
- Gift Boxes: Package your cookies in clear cellophane bags or decorative boxes. Tie them with a ribbon for a charming gift. These make wonderful presents for birthdays, holidays, or as a thank-you gesture.
- Tea or Coffee Pairing: Serve your cookies alongside a warm cup of tea or coffee. The buttery flavor of the cookies pairs beautifully with the rich taste of these beverages, creating a delightful afternoon treat.
- Cookie Decorating Party: Host a cookie decorating party! Provide plain cookies and various colors of royal icing, sprinkles, and edible decorations. This is a fun activity for kids and adults alike, allowing everyone to unleash their creativity.
- Special Occasions: Use these cookies as a centerpiece for special events. Whether it’s a wedding, baby shower, or holiday celebration, these cookies can be customized to match the theme, adding a personal touch to your event.
With these serving suggestions, your Floral Butter Cookies with Royal Icing will not only taste amazing but also look stunning on any table. Enjoy sharing these delightful treats with family and friends!
Tips for Perfect Floral Butter Cookies with Royal Icing
Creating the perfect Floral Butter Cookies with Royal Icing requires a bit of practice and attention to detail. Here are some helpful tips to ensure your cookies turn out beautifully every time:
- Measure Ingredients Accurately: Baking is a science, so precise measurements are crucial. Use measuring cups and spoons for dry ingredients and a liquid measuring cup for wet ingredients. This will help you achieve the right texture and flavor.
- Chill the Dough: Don’t skip the chilling step! Chilling the dough for at least an hour helps the cookies maintain their shape while baking. If the dough becomes too warm while rolling, return it to the fridge for a few minutes.
- Use Quality Ingredients: The flavor of your cookies will depend on the quality of your ingredients. Use fresh butter, pure vanilla extract, and high-quality powdered sugar for the royal icing. This will enhance the overall taste of your cookies.
- Practice Piping: If you’re new to decorating with royal icing, practice piping on parchment paper before decorating the cookies. This will help you get a feel for the piping bag and control the flow of icing.
- Let Icing Dry Completely: After decorating, allow the royal icing to dry completely before stacking or packaging the cookies. This can take several hours or even overnight. Proper drying ensures the designs stay intact.
- Store Properly: To keep your cookies fresh, store them in an airtight container at room temperature. If you’ve decorated them, place parchment paper between layers to prevent sticking.
- Experiment with Techniques: Don’t be afraid to try different decorating techniques! Use various piping tips, create marbled effects, or add edible glitter for a fun twist. Each batch can be a new adventure!
By following these tips, you’ll be well on your way to mastering the art of Floral Butter Cookies with Royal Icing. Enjoy the process and have fun creating these delightful treats!
Breakdown of Time for Floral Butter Cookies with Royal Icing
Prep Time
Preparing Floral Butter Cookies with Royal Icing is a delightful process that requires some time. The prep time includes gathering your ingredients, mixing the dough, and chilling it. Overall, you should set aside about 30 minutes for this step. However, don’t forget to include the chilling time of at least 1 hour. This is crucial for achieving the perfect cookie shape.
Cooking Time
Once your dough is ready and chilled, the cooking time is relatively quick. Baking the cookies takes about 8-10 minutes. Keep an eye on them to ensure they don’t overbake. After baking, allow the cookies to cool for another 10-15 minutes on the baking sheet before transferring them to a wire rack. This cooling period is essential for the cookies to firm up properly.
Total Time
In total, you should expect to spend around 2 hours to make Floral Butter Cookies with Royal Icing. This includes prep time, chilling, baking, and cooling. If you plan to decorate the cookies, factor in additional time for making and applying the royal icing. Allowing the icing to dry completely can take several hours or even overnight, depending on the humidity in your kitchen. So, while the active time is manageable, planning ahead will ensure you have beautiful cookies ready for your special occasion!
Nutritional Information for Floral Butter Cookies with Royal Icing
Calories
When indulging in Floral Butter Cookies with Royal Icing, it’s good to be aware of the calorie content. Each cookie contains approximately 120 calories. This number can vary slightly based on the size of the cookie and the amount of royal icing used. While these cookies are a delightful treat, moderation is key to enjoying them as part of a balanced diet.
Protein
In terms of protein, each Floral Butter Cookie offers about 1.5 grams. This is a modest amount, as cookies are primarily a source of carbohydrates and fats. However, the inclusion of egg in the recipe contributes to this protein content. If you’re looking to boost the protein in your diet, consider pairing these cookies with a glass of milk or a yogurt dip for a more balanced snack.
Sodium
Regarding sodium, each cookie contains around 50 milligrams. This is relatively low, making these cookies a suitable option for those watching their sodium intake. However, if you are sensitive to salt, be mindful of the total sodium from other foods consumed throughout the day. Enjoying these cookies as an occasional treat can fit well into a healthy lifestyle.
FAQs about Floral Butter Cookies with Royal Icing
Can I use different flavors for the royal icing?
Absolutely! You can customize the flavor of your royal icing to match your cookies or the occasion. Instead of just using lemon juice or vanilla extract, consider adding almond extract, orange juice, or even a splash of your favorite liqueur. Just remember to keep the liquid content balanced, so the icing maintains its consistency. Experimenting with flavors can add a delightful twist to your Floral Butter Cookies!
How long do Floral Butter Cookies last?
Floral Butter Cookies with Royal Icing can last quite a while if stored properly. Generally, they stay fresh for about 1-2 weeks at room temperature. Make sure to keep them in an airtight container to prevent them from becoming stale. If you want to enjoy them longer, consider freezing them. Just be sure to separate layers with parchment paper to avoid sticking!
Can I freeze Floral Butter Cookies with Royal Icing?
Yes, you can freeze these cookies! To freeze, place the decorated cookies in a single layer on a baking sheet and freeze until solid. Then, transfer them to an airtight container or freezer bag, separating layers with parchment paper. They can be frozen for up to 3 months. When you’re ready to enjoy them, simply thaw at room temperature. This way, you can have delicious cookies ready for any occasion!
What is the best way to store decorated cookies?
To keep your decorated Floral Butter Cookies looking and tasting great, store them in an airtight container. If you have multiple layers, place parchment paper between them to prevent sticking. It’s best to keep them at room temperature, away from direct sunlight or heat. Avoid refrigerating them, as this can cause the royal icing to become sticky. Proper storage will ensure your cookies remain fresh and beautiful for days!
Conclusion on Floral Butter Cookies with Royal Icing
In conclusion, Floral Butter Cookies with Royal Icing are a delightful treat that combines taste and artistry. These cookies are not only easy to make but also offer endless possibilities for customization. Whether you’re baking for a special occasion or just to satisfy a sweet craving, these cookies are sure to impress.
With their buttery flavor and beautiful decorations, they can brighten up any gathering. Plus, the joy of decorating them adds an extra layer of fun to the baking process. Remember, the key to perfect cookies lies in using quality ingredients, following the steps carefully, and allowing your creativity to shine through in the designs.
So, gather your ingredients, invite some friends or family to join in, and start baking! Enjoy the process, and don’t forget to share your delicious creations. Whether you keep them for yourself or gift them to loved ones, these Floral Butter Cookies with Royal Icing are bound to bring smiles and sweet moments to everyone who tries them. Happy baking!
Relevant Recipes Link:
Craving more delightful recipes like the one you just enjoyed? Explore these mouthwatering options:
- Butter Cookies with Guava: A Tropical Delight
- Garlic Butter Beef Bites with Roasted Potatoes: A Flavorful Choice
- Peanut Butter Cookie Bars Lunch Lady Style: A Sweet Treat
For more fantastic recipes and food inspiration, follow us on Pinterest!