Introduction to Banana Pudding Cheesecake Recipe
What Makes This Dessert Special?
Banana Pudding Cheesecake is a delightful dessert that combines two beloved treats into one. The creamy cheesecake base is enriched with the sweet flavor of ripe bananas, creating a luscious experience in every bite. The buttery graham cracker crust adds a satisfying crunch, while the whipped cream topping and fresh banana slices provide a beautiful finish. This dessert is not just a feast for the taste buds; it’s also a feast for the eyes! Perfect for gatherings, it brings joy to any occasion.
A Brief History of Cheesecake and Banana Pudding
Cheesecake has a long and rich history, dating back to ancient Greece. The Greeks served a version of cheesecake to athletes during the first Olympic Games. Over the years, this dessert evolved, with various cultures adding their unique twists. In the United States, cheesecake became popular in the 19th century, especially with the introduction of cream cheese.
On the other hand, banana pudding has its roots in the Southern United States. It became a staple dessert in the early 1900s, often made with layers of vanilla wafers, bananas, and creamy pudding. The combination of these two desserts into the Banana Pudding Cheesecake is a modern twist that celebrates the best of both worlds. This fusion not only highlights the creamy texture of cheesecake but also the comforting flavors of banana pudding, making it a favorite among dessert lovers.
Ingredients for Banana Pudding Cheesecake Recipe
To create this delicious Banana Pudding Cheesecake, you will need a variety of ingredients that come together to form a rich and creamy dessert. Here’s a complete list of what you’ll need:
- 1 cup crushed vanilla wafers or graham crackers
- 1/2 cup melted butter
- 2 tbsp sugar
- 16 oz cream cheese, softened
- 1/2 cup sugar
- 2 large eggs
- 1/2 cup sour cream
- 1 tsp vanilla extract
- 1 small banana, mashed
- 1 package instant banana pudding mix
- 1 1/2 cups cold milk
- 1 cup whipped topping
- Fresh banana slices for garnish
- 1/2 cup whipped cream for decoration
- Crushed vanilla wafers or graham crackers for topping
- Powdered sugar for dusting
These ingredients are easy to find and will help you create a dessert that is sure to impress. The combination of cream cheese, bananas, and pudding mix creates a delightful flavor that is both comforting and indulgent. So, gather your ingredients and get ready to make a dessert that everyone will love!
Step-by-Step Preparation of Banana Pudding Cheesecake Recipe
Step 1: Make the Crust
Creating the crust is the first step in making your Banana Pudding Cheesecake. Start by preheating your oven to 325°F (163°C). In a mixing bowl, combine the crushed vanilla wafers or graham crackers with melted butter and sugar. Stir until the mixture is well combined and resembles wet sand.
Next, press this mixture firmly into the bottom of a 9-inch springform pan. Make sure it’s evenly spread to create a solid base. Bake the crust in the preheated oven for 8-10 minutes. Once done, remove it from the oven and let it cool completely. This crust will provide a delicious crunch that complements the creamy filling.
Step 2: Make the Cheesecake Filling
Now, let’s move on to the cheesecake filling. In a large mixing bowl, beat the softened cream cheese and sugar together until the mixture is smooth and creamy. This step is crucial for achieving a velvety texture. Next, add the eggs one at a time, mixing well after each addition. This ensures that the eggs are fully incorporated.
After that, stir in the sour cream, vanilla extract, and the mashed banana. Mix until everything is well combined. Once your filling is ready, pour it over the cooled crust in the springform pan. Bake this in the oven for 35-40 minutes. The cheesecake should be set but still slightly jiggly in the center. After baking, let it cool completely before refrigerating for at least 4 hours. This chilling time allows the flavors to meld beautifully.
Step 3: Make the Banana Pudding Layer
While your cheesecake is chilling, it’s time to prepare the banana pudding layer. In a separate bowl, whisk together the instant banana pudding mix and cold milk. Keep whisking until the mixture thickens, which usually takes about 2 minutes. Once thickened, gently fold in the whipped topping. This will give your pudding layer a light and airy texture.
Spread this banana pudding mixture evenly over the chilled cheesecake layer. Make sure to cover it completely for a delightful surprise in every slice. This layer adds a rich banana flavor that pairs perfectly with the cheesecake.
Step 4: Decorate & Serve
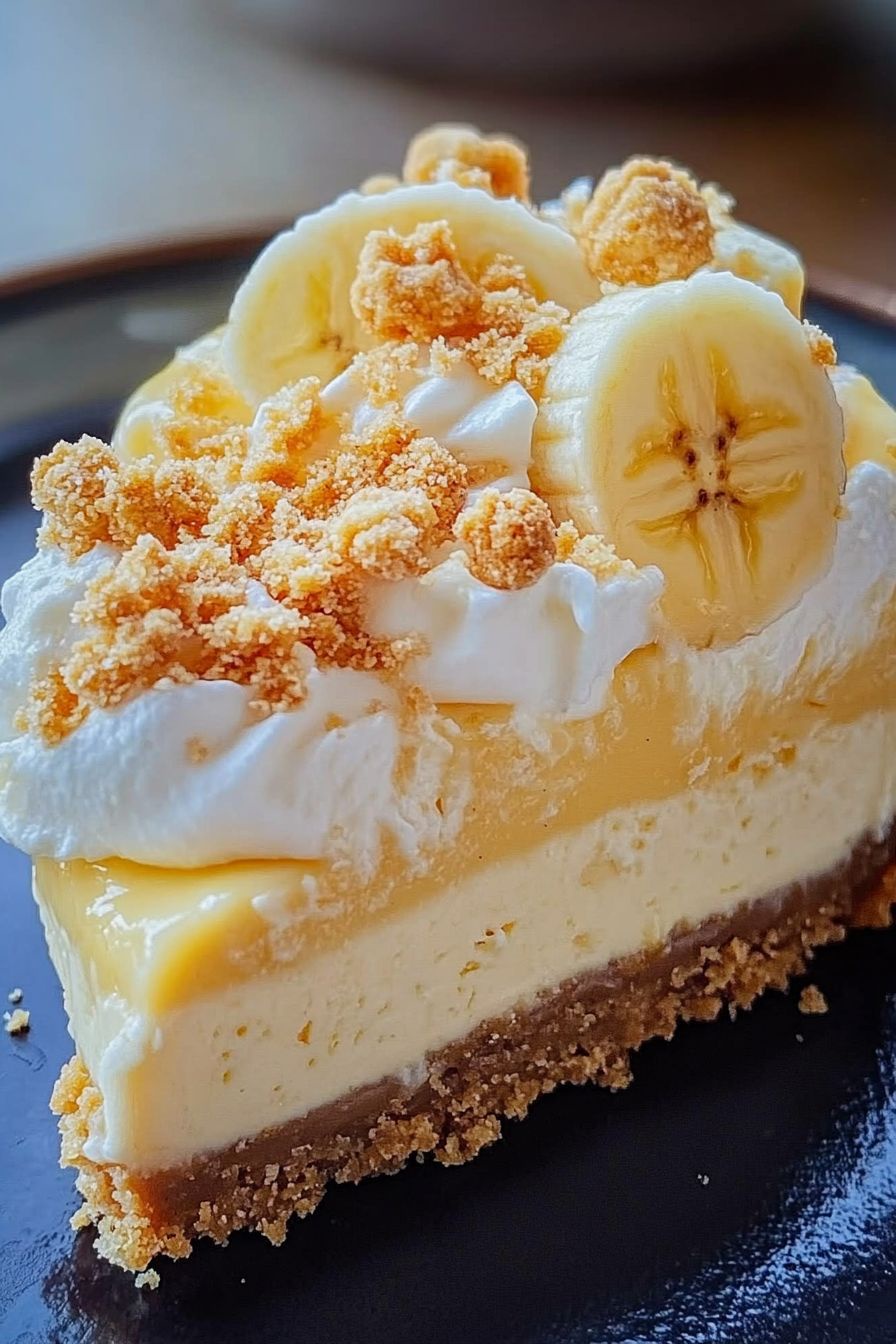
Finally, it’s time to decorate your Banana Pudding Cheesecake! Start by piping whipped cream on top of the pudding layer. This adds a beautiful finish and extra creaminess. Next, garnish with fresh banana slices and sprinkle crushed vanilla wafers or graham crackers on top for added texture.
For a final touch, dust the top with powdered sugar. This not only looks appealing but also adds a hint of sweetness. Now, slice your cheesecake and serve it to your eager guests. Enjoy the delightful combination of flavors and textures in every bite!
Variations of Banana Pudding Cheesecake Recipe
Gluten-Free Options
If you or your guests are following a gluten-free diet, you can still enjoy this delicious Banana Pudding Cheesecake! To make a gluten-free version, simply substitute the crushed vanilla wafers or graham crackers with gluten-free alternatives. Look for gluten-free cookie brands that mimic the taste and texture of traditional wafers. You can also use almond flour or gluten-free graham cracker crumbs mixed with melted butter and sugar for the crust.
Additionally, ensure that the instant banana pudding mix you choose is labeled gluten-free. Most brands are, but it’s always good to double-check. With these simple swaps, you can create a delightful dessert that everyone can enjoy without compromising on flavor!
Vegan Alternatives
For those who prefer a vegan option, making a Banana Pudding Cheesecake is entirely possible! Start by replacing the cream cheese with a vegan cream cheese alternative. There are many brands available that offer a similar creamy texture and taste. Instead of eggs, you can use flaxseed meal or chia seeds mixed with water as a binding agent. For every egg, mix 1 tablespoon of flaxseed meal with 2.5 tablespoons of water and let it sit until it thickens.
For the sour cream, you can use a dairy-free yogurt or a homemade cashew cream. Simply blend soaked cashews with a bit of lemon juice and water until smooth. Lastly, ensure that the instant banana pudding mix is vegan-friendly, or you can make your own pudding using cornstarch, almond milk, and mashed bananas. With these adjustments, you’ll have a creamy, delicious vegan Banana Pudding Cheesecake that everyone will love!
Cooking Note for Banana Pudding Cheesecake Recipe
When preparing your Banana Pudding Cheesecake, there are a few important cooking notes to keep in mind. These tips will help ensure that your dessert turns out perfectly every time.
First, make sure all your ingredients are at room temperature before you start mixing. This includes the cream cheese, eggs, and sour cream. Room temperature ingredients blend more easily, resulting in a smoother filling. If you forget to take them out in advance, you can warm the cream cheese slightly in the microwave for about 10-15 seconds. Just be careful not to melt it!
Next, avoid overmixing the cheesecake filling. While it’s important to combine the ingredients well, overmixing can introduce too much air into the batter. This can lead to cracks in your cheesecake as it bakes. Mix until just combined for the best results.
When baking the cheesecake, keep an eye on the time. Ovens can vary, so check for doneness a few minutes before the suggested baking time. The cheesecake should be set around the edges but still slightly jiggly in the center. It will continue to firm up as it cools.
Lastly, patience is key! Allow the cheesecake to cool completely before refrigerating it. Chilling it for at least 4 hours, or overnight if possible, will enhance the flavors and improve the texture. This waiting period is essential for achieving that perfect slice when you’re ready to serve.
By following these cooking notes, you’ll be well on your way to creating a delicious Banana Pudding Cheesecake that will impress your family and friends!
Serving Suggestions for Banana Pudding Cheesecake Recipe
Ideal Occasions for Serving
Banana Pudding Cheesecake is a versatile dessert that fits perfectly into various occasions. Whether you’re hosting a birthday party, a family gathering, or a summer barbecue, this cheesecake will surely be a hit. Its delightful combination of flavors makes it a crowd-pleaser.
For special celebrations like anniversaries or holidays, this dessert adds a touch of elegance to your table. Imagine serving it at a Thanksgiving dinner or a Christmas party; it’s bound to impress your guests! Additionally, it’s a fantastic choice for potlucks or picnics, as it’s easy to transport and can be made ahead of time.
Even casual get-togethers with friends can be elevated with this delicious treat. Just slice it up, and watch everyone enjoy the creamy goodness. No matter the occasion, Banana Pudding Cheesecake is sure to bring smiles and satisfaction!
Pairing Drinks with Your Dessert
To enhance your Banana Pudding Cheesecake experience, consider pairing it with the right drinks. A classic choice is a cup of coffee or espresso. The rich flavors of coffee complement the sweetness of the cheesecake beautifully. If you prefer something cold, a glass of iced tea or lemonade can provide a refreshing contrast.
For those who enjoy wine, a sweet dessert wine like Moscato or a light Riesling pairs wonderfully with the creamy texture of the cheesecake. If you’re looking for a non-alcoholic option, a creamy milkshake or a banana smoothie can be a fun and delicious pairing.
Ultimately, the right drink can elevate your dessert experience, making it even more enjoyable. So, choose your favorite beverage and get ready to indulge in the delightful flavors of Banana Pudding Cheesecake!
Tips for Perfecting Your Banana Pudding Cheesecake Recipe
Common Mistakes to Avoid
When making your Banana Pudding Cheesecake, avoiding common mistakes can make a big difference in the final result. First, be careful not to overmix your cheesecake filling. While it’s tempting to whip it until perfectly smooth, overmixing can introduce too much air. This can lead to cracks in your cheesecake as it bakes. Instead, mix just until combined for a smooth texture.
Another mistake to watch out for is not allowing your ingredients to reach room temperature. Cold ingredients can create lumps in your batter. Always take your cream cheese, eggs, and sour cream out of the fridge ahead of time. If you forget, you can warm the cream cheese slightly in the microwave, but be cautious not to melt it.
Also, keep an eye on your baking time. Ovens can vary, so check your cheesecake a few minutes before the suggested time. It should be set around the edges but still slightly jiggly in the center. This ensures a creamy texture once it cools.
Lastly, don’t skip the chilling time! Allow your cheesecake to cool completely before refrigerating it for at least 4 hours. This step is crucial for the flavors to meld and for the cheesecake to set properly. Patience is key to achieving that perfect slice!
Storage Tips for Leftovers
If you have any leftovers of your delicious Banana Pudding Cheesecake, storing them properly is essential to maintain freshness. First, cover the cheesecake tightly with plastic wrap or aluminum foil. This will help prevent it from absorbing any odors from the fridge.
For best results, store your cheesecake in the refrigerator. It can last for about 3-5 days when stored correctly. If you want to keep it longer, consider freezing it. To freeze, slice the cheesecake into individual portions and wrap each slice in plastic wrap. Then, place the wrapped slices in an airtight container or freezer bag. This way, you can enjoy a piece of cheesecake whenever you crave it!
When you’re ready to enjoy your frozen cheesecake, simply transfer it to the fridge to thaw overnight. Avoid thawing it in the microwave, as this can change the texture. With these storage tips, you can savor your Banana Pudding Cheesecake for days to come!
Breakdown of Time for Banana Pudding Cheesecake Recipe
Prep Time
The prep time for your Banana Pudding Cheesecake is approximately 30 minutes. This includes gathering all your ingredients, making the crust, and preparing the cheesecake filling. It’s a straightforward process, and with everything laid out, you’ll find it easy to whip up this delicious dessert. Just remember to take your cream cheese and eggs out of the fridge ahead of time so they can reach room temperature!
Cooking Time
The cooking time for this cheesecake is about 40 minutes. During this time, the cheesecake will bake in the oven, allowing it to set perfectly. After baking, it’s crucial to let the cheesecake cool completely before refrigerating it. This cooling period is essential for achieving the right texture and flavor.
Total Time
In total, you should plan for about 5 hours and 10 minutes to make your Banana Pudding Cheesecake. This includes the prep time, cooking time, and the necessary chilling time of at least 4 hours. While it may seem like a long wait, the end result is well worth it! You’ll have a creamy, delicious dessert that’s perfect for any occasion.
Nutritional Information for Banana Pudding Cheesecake Recipe
Calories and Macronutrients
Understanding the nutritional content of your Banana Pudding Cheesecake can help you enjoy it mindfully. Each serving of this delightful dessert contains approximately 320 calories. This calorie count includes a balance of macronutrients that contribute to its rich flavor and creamy texture.
Here’s a breakdown of the macronutrients per serving:
- Fat: 20g
- Carbohydrates: 30g
- Protein: 4g
The fat content primarily comes from the cream cheese and whipped topping, providing that luscious creaminess we all love. The carbohydrates mainly come from the sugar and the crust, while the protein is contributed by the cream cheese and eggs. This balance makes it a satisfying treat, perfect for special occasions.
Health Considerations
While Banana Pudding Cheesecake is a delicious indulgence, it’s important to consider its nutritional aspects. The dessert contains sugar and fat, which should be enjoyed in moderation. If you’re watching your sugar intake, you can opt for sugar substitutes or reduce the amount of sugar in the recipe. Additionally, using low-fat cream cheese can help lower the overall fat content.
Bananas, a key ingredient in this recipe, provide essential vitamins and minerals. They are a good source of potassium, vitamin C, and dietary fiber. This means that while you enjoy your cheesecake, you’re also getting some nutritional benefits from the bananas!
For those with dietary restrictions, remember that there are gluten-free and vegan options available. By making these adjustments, you can still enjoy this delightful dessert without compromising your health goals. Always listen to your body and enjoy treats like this in moderation for a balanced diet.
FAQs About Banana Pudding Cheesecake Recipe
Can I make this cheesecake ahead of time?
Absolutely! In fact, making your Banana Pudding Cheesecake ahead of time is a great idea. This dessert benefits from chilling, as it allows the flavors to meld beautifully. You can prepare it a day or two in advance and store it in the refrigerator. Just be sure to cover it well with plastic wrap or aluminum foil to keep it fresh. When you’re ready to serve, simply add the whipped cream and toppings for a delightful finish!
How do I store leftovers?
If you have any leftovers, storing them properly is key to maintaining their deliciousness. First, cover the cheesecake tightly with plastic wrap or aluminum foil. This prevents it from absorbing any odors from the fridge. Store it in the refrigerator, where it can last for about 3-5 days. If you want to keep it longer, consider freezing it. Slice the cheesecake into individual portions, wrap each slice in plastic wrap, and place them in an airtight container. This way, you can enjoy a piece whenever you crave it!
Can I use fresh bananas instead of instant pudding?
While fresh bananas add a wonderful flavor, they cannot fully replace the instant pudding mix in this recipe. The pudding mix helps create a creamy texture and stability in the banana pudding layer. However, you can certainly add fresh banana slices to enhance the flavor! If you want to make a homemade pudding, you can use fresh bananas along with cornstarch, milk, and sugar to create a delicious banana pudding from scratch.
What can I substitute for cream cheese?
If you need a substitute for cream cheese, there are several options available. For a dairy-free alternative, you can use vegan cream cheese, which mimics the texture and taste of traditional cream cheese. If you’re looking for a lighter option, consider using Greek yogurt or cottage cheese blended until smooth. These alternatives will change the flavor slightly but can still create a delicious cheesecake. Just keep in mind that the texture may vary depending on the substitute you choose!
Conclusion on Banana Pudding Cheesecake Recipe
Final Thoughts and Encouragement to Try the Recipe
In conclusion, the Banana Pudding Cheesecake is a delightful dessert that brings together the best of both worlds: the creamy richness of cheesecake and the comforting flavors of banana pudding. This recipe is not only easy to follow but also allows for creativity with variations to suit different dietary needs. Whether you’re making it for a special occasion or just to satisfy your sweet tooth, this cheesecake is sure to impress.
As you embark on your baking journey, remember that the joy of cooking comes from experimenting and sharing delicious treats with loved ones. Don’t hesitate to make this Banana Pudding Cheesecake your own by adding your favorite toppings or trying out the gluten-free or vegan options. The smiles and compliments you receive will be well worth the effort!
So, gather your ingredients, roll up your sleeves, and dive into this scrumptious recipe. You’ll be rewarded with a dessert that not only tastes amazing but also brings happiness to those who enjoy it. Happy baking!