Introduction to Upside-Down Orange Cake
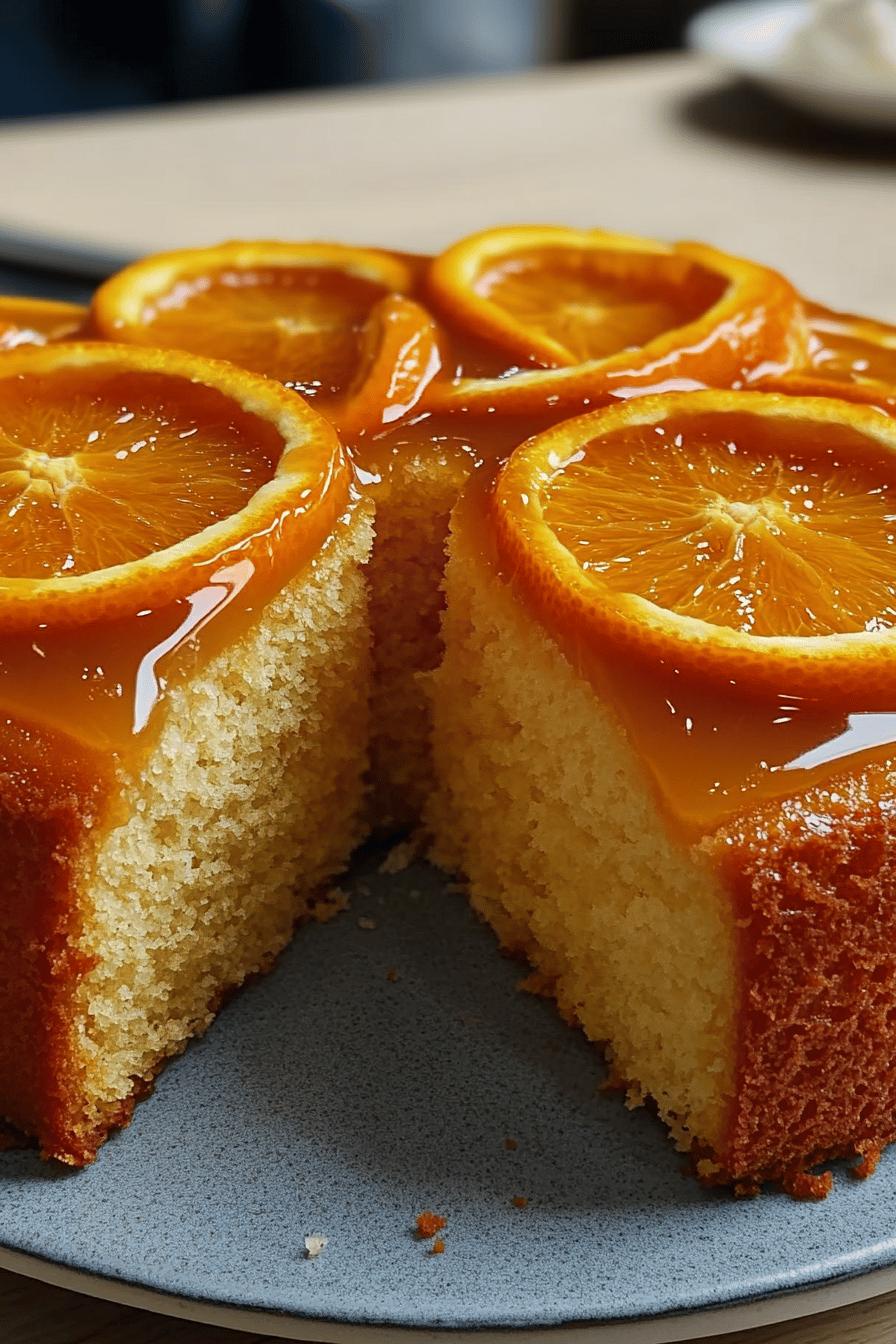
Welcome to the world of delightful desserts! Today, we’re diving into the sweet and tangy realm of the Upside-Down Orange Cake. This cake is not just a treat for your taste buds; it’s a feast for your eyes too. Imagine a beautiful golden-orange hue, glistening with caramel, and topped with juicy orange slices. It’s a showstopper that will brighten up any table!
What Makes Upside-Down Orange Cake Special?
What sets the Upside-Down Orange Cake apart from other desserts? It’s all about the unique combination of flavors and textures. The cake features a luscious caramel orange base that melts in your mouth. The moist sponge cake, infused with fresh orange zest and juice, adds a delightful citrusy flavor. This cake is not only delicious but also visually stunning, making it a perfect centerpiece for any gathering.
Moreover, the upside-down style means that the oranges caramelize beautifully as they bake, creating a sweet topping that contrasts perfectly with the light sponge. Each slice reveals a beautiful pattern of oranges, making it a delightful surprise for your guests. It’s a cake that tells a story with every bite!
The Perfect Dessert for Any Occasion
Whether you’re celebrating a birthday, hosting a summer barbecue, or simply enjoying a cozy family dinner, the Upside-Down Orange Cake fits right in. Its bright flavors make it an ideal dessert for warm weather, while its elegant presentation makes it suitable for special occasions. Plus, it’s easy to make, so you can whip it up without any fuss!
Imagine serving this cake at your next gathering. Your friends and family will be impressed by your baking skills, and they’ll love the refreshing taste of oranges. It’s a dessert that brings joy and smiles, making it a must-try for anyone who loves sweet treats. So, let’s get started on this delicious journey!
Ingredients for Upside-Down Orange Cake
To create the delightful Upside-Down Orange Cake, you’ll need a few simple ingredients. Each component plays a vital role in bringing out the cake’s rich flavors and textures. Here’s what you’ll need:
- For the Caramel Orange Base:
- 1 cup brown sugar
- 1/4 cup unsalted butter
- 2-3 medium oranges, thinly sliced
- For the Moist Sponge Cake:
- 1 1/2 cups all-purpose flour
- 1 cup granulated sugar
- 1/2 cup unsalted butter, softened
- 2 large eggs
- 1/2 cup milk
- 1 tablespoon orange zest
- 1/4 cup fresh orange juice
- 2 teaspoons baking powder
- 1/2 teaspoon salt
These ingredients come together to create a cake that is not only delicious but also visually appealing. The caramelized oranges on top provide a sweet and tangy flavor, while the sponge cake remains light and fluffy. Make sure to gather everything before you start baking, as it will make the process smoother and more enjoyable!
Step-by-Step Preparation of Upside-Down Orange Cake
Now that you have all your ingredients ready, it’s time to bring this Upside-Down Orange Cake to life! Follow these simple steps to create a cake that will impress everyone. Let’s get started!
Step 1: Prepare the Caramel Orange Base
First, we need to create the delicious caramel orange base. This step is crucial as it sets the stage for the cake’s flavor. Begin by melting the butter in a medium saucepan over low heat. Once melted, add the brown sugar and stir until it’s well combined. Keep stirring until the mixture is smooth and bubbly. This should take about 2-3 minutes.
Next, take your thinly sliced oranges and arrange them in a single layer at the bottom of a greased round cake pan. Pour the caramel mixture evenly over the oranges. Make sure every slice is coated. This caramel will create a sweet topping that will shine when the cake is flipped over!
Step 2: Make the Moist Sponge Cake Batter
Now, let’s whip up the moist sponge cake batter! In a large mixing bowl, cream together the softened butter and granulated sugar until it’s light and fluffy. This should take about 3-4 minutes. Next, add the eggs one at a time, mixing well after each addition.
In another bowl, combine the flour, baking powder, and salt. Gradually add this dry mixture to the butter mixture, alternating with the milk. Don’t forget to add the fresh orange juice and orange zest! Mix until everything is just combined. Be careful not to overmix, as this can make the cake dense.
Step 3: Combine and Bake the Cake
Now it’s time to bring everything together! Pour the sponge cake batter over the caramel orange base in the cake pan. Use a spatula to spread it evenly. This ensures that every bite has that delightful orange flavor.
Preheat your oven to 350°F (175°C) and bake the cake for about 30-35 minutes. You’ll know it’s done when a toothpick inserted into the center comes out clean. The aroma of oranges and caramel will fill your kitchen, making it hard to wait!
Step 4: Cool and Flip the Cake
Once the cake is baked, remove it from the oven and let it cool in the pan for about 10 minutes. This cooling time is important as it allows the caramel to set slightly. After that, carefully run a knife around the edges of the cake to loosen it.
Now comes the exciting part! Place a serving plate on top of the cake pan and quickly flip it over. Gently lift the pan off, revealing the beautiful caramelized oranges on top. Let the cake cool completely before slicing. Your Upside-Down Orange Cake is now ready to be enjoyed!
Variations of Upside-Down Orange Cake
The Upside-Down Orange Cake is a versatile dessert that can be easily adapted to suit different tastes. Whether you want to experiment with other citrus fruits or need a gluten-free option, there are plenty of ways to make this cake your own. Let’s explore some delicious variations!
Adding Different Citrus Fruits
One of the best things about the Upside-Down Orange Cake is that you can switch up the fruits to create new flavors. For instance, consider using lemons, limes, or grapefruits. Each fruit brings its unique taste and aroma, making the cake refreshing and exciting.
To make a lemon version, simply replace the oranges with thinly sliced lemons. You can also add a bit of lemon zest to the batter for an extra zing. If you prefer limes, use them in the same way. The tartness of these fruits will balance beautifully with the sweetness of the caramel.
For a grapefruit twist, slice the fruit thinly and follow the same steps. The slight bitterness of grapefruit adds a sophisticated touch to the cake. Feel free to mix and match different citrus fruits for a colorful and flavorful cake that will wow your guests!
Gluten-Free Options for Upside-Down Orange Cake
If you or your guests are gluten-sensitive, you can still enjoy this delightful cake! Making a gluten-free version is simple. Just substitute the all-purpose flour with a gluten-free flour blend. Many blends work well in baking, so choose one that you like.
Additionally, ensure that your baking powder is gluten-free, as some brands may contain gluten. The rest of the ingredients remain the same, so you can enjoy the same delicious flavors without worry. Your gluten-free Upside-Down Orange Cake will be just as moist and flavorful as the original!
These variations not only keep the cake exciting but also allow you to cater to different dietary needs. So, don’t hesitate to get creative and make this cake your own!
Cooking Note for Upside-Down Orange Cake
When it comes to baking the Upside-Down Orange Cake, a few cooking notes can help ensure your cake turns out perfectly every time. These tips will guide you through the process and enhance your baking experience.
First, always use fresh oranges for the best flavor. Fresh fruit not only tastes better but also provides a vibrant color that enhances the cake’s appearance. If you can, choose organic oranges, as they are often more flavorful and free from pesticides.
Next, be mindful of the caramel. When preparing the caramel orange base, make sure to stir continuously to prevent it from burning. The caramel should be smooth and bubbly before you pour it over the oranges. If it becomes too thick, you can add a splash of water to loosen it up.
Additionally, ensure your oven is preheated to the correct temperature. An oven thermometer can help you check if your oven is accurate. Baking at the right temperature is crucial for achieving a light and fluffy sponge cake.
Lastly, let the cake cool in the pan for the recommended time. This step is essential for allowing the caramel to set properly. If you try to flip the cake too soon, the caramel may run off, and you won’t get that beautiful topping you desire.
By following these cooking notes, you’ll be well on your way to creating a stunning and delicious Upside-Down Orange Cake that will impress everyone at your next gathering!
Serving Suggestions for Upside-Down Orange Cake
Now that your Upside-Down Orange Cake is ready, it’s time to think about how to serve it! This cake is delicious on its own, but pairing it with other treats can elevate the experience. Here are some delightful serving suggestions that will make your dessert even more enjoyable.
Pairing with Ice Cream or Whipped Cream
One of the best ways to enjoy your Upside-Down Orange Cake is by serving it with a scoop of vanilla ice cream or a dollop of whipped cream. The creamy texture of ice cream complements the moist cake beautifully. As you take a bite, the cold ice cream melts into the warm cake, creating a delightful contrast.
For a twist, consider using flavored ice cream, such as orange or coconut. These flavors will enhance the citrus notes of the cake, making each bite even more refreshing. If you prefer whipped cream, you can add a sprinkle of orange zest on top for an extra touch. This simple addition will not only look pretty but also add a burst of flavor!
Serving with Fresh Fruit
Another fantastic way to serve your Upside-Down Orange Cake is with fresh fruit. Slices of strawberries, blueberries, or raspberries can add a pop of color and freshness to your dessert plate. The tartness of these berries balances the sweetness of the cake, creating a harmonious flavor profile.
You can also create a fruit salad to accompany the cake. Mix together your favorite seasonal fruits for a vibrant and healthy side. This not only enhances the presentation but also adds a refreshing element to the meal. Your guests will appreciate the combination of flavors and textures!
These serving suggestions will surely impress your guests and make your Upside-Down Orange Cake a memorable dessert. Whether you choose to pair it with ice cream, whipped cream, or fresh fruit, each option brings something special to the table. Enjoy your delicious creation!
Tips for Perfecting Your Upside-Down Orange Cake
To make your Upside-Down Orange Cake truly exceptional, a few tips can help you achieve the best results. From selecting the right oranges to ensuring the cake remains moist, these suggestions will guide you in creating a delightful dessert that everyone will love.
Choosing the Right Oranges
The choice of oranges can significantly impact the flavor of your cake. When selecting oranges, look for ones that are firm and heavy for their size. This usually indicates juiciness. Navel oranges are a great option because they are sweet and easy to peel. However, you can also use Valencia oranges for a slightly tangier flavor.
Always opt for fresh oranges rather than pre-packaged ones. Fresh fruit not only tastes better but also has a vibrant color that enhances the cake’s appearance. If possible, choose organic oranges, as they are often more flavorful and free from pesticides. Remember to wash the oranges thoroughly before using them, especially if you plan to use the zest in your cake batter.
Ensuring the Cake is Moist
A moist cake is key to a delightful dessert experience. To ensure your Upside-Down Orange Cake stays moist, there are a few techniques you can use. First, be careful not to overmix the batter. Overmixing can lead to a dense cake, so mix just until the ingredients are combined.
Another tip is to use room temperature ingredients. When your butter, eggs, and milk are at room temperature, they blend more easily, resulting in a lighter batter. Additionally, consider adding a bit more orange juice or zest to the batter for extra moisture and flavor.
Lastly, avoid overbaking the cake. Keep an eye on the baking time and perform the toothpick test. Insert a toothpick into the center of the cake; if it comes out clean or with a few moist crumbs, the cake is done. If you bake it too long, it can dry out, so set a timer and check a few minutes before the recommended time.
By following these tips, you’ll create a stunning and moist Upside-Down Orange Cake that will impress your guests and leave them wanting more!
Breakdown of Time for Upside-Down Orange Cake
Understanding the time needed to make the Upside-Down Orange Cake can help you plan your baking session better. Here’s a simple breakdown of the time required for each step, so you know exactly what to expect!
Prep Time
The prep time for this delightful cake is about 20-25 minutes. During this time, you’ll gather all your ingredients, prepare the caramel orange base, and mix the sponge cake batter. It’s a good idea to have everything ready before you start baking. This way, you can enjoy the process without feeling rushed!
Cooking Time
Once your cake is ready to go into the oven, the cooking time is approximately 30-35 minutes. Keep an eye on it as it bakes. The aroma of caramel and oranges will fill your kitchen, making it hard to wait! You’ll know it’s done when a toothpick inserted into the center comes out clean.
Total Time
In total, you can expect to spend about 60-70 minutes from start to finish. This includes both prep and cooking time. Once the cake is baked, don’t forget to let it cool for about 10 minutes before flipping it over. This cooling period is essential for the caramel to set properly.
With this time breakdown, you can easily fit the Upside-Down Orange Cake into your schedule. It’s a quick and rewarding baking project that will surely impress your family and friends!
Nutritional Information for Upside-Down Orange Cake
Understanding the nutritional content of your Upside-Down Orange Cake can help you enjoy it even more. This cake is not only delicious but also provides some essential nutrients. Here’s a breakdown of the key nutritional information per serving, which is typically one slice of cake.
Calories
Each slice of the Upside-Down Orange Cake contains approximately 250-300 calories. This number can vary based on the specific ingredients used and the size of the slice. The cake’s sweetness comes from the brown sugar and the natural sugars in the oranges, making it a delightful treat without being overly indulgent.
Protein
In terms of protein, each slice offers about 3-4 grams. The protein mainly comes from the eggs and milk used in the sponge cake batter. While this isn’t a high-protein dessert, it does provide a small amount that can contribute to your daily intake.
Sodium
The sodium content in a slice of Upside-Down Orange Cake is relatively low, around 150-200 milligrams. This is primarily due to the salt added to the batter. Keeping the sodium level in check makes this cake a suitable option for those watching their salt intake.
Overall, the Upside-Down Orange Cake can be enjoyed as part of a balanced diet. It’s a sweet treat that brings joy without excessive calories or sodium. So, feel free to indulge in this delightful dessert at your next gathering!
FAQs about Upside-Down Orange Cake
Can I use other fruits for an upside-down cake?
Absolutely! The beauty of an upside-down cake is its versatility. While oranges are the star of this recipe, you can easily swap them for other fruits. Consider using pineapples, peaches, or even apples. Each fruit brings its unique flavor and texture, making the cake exciting and different every time. Just remember to adjust the cooking time slightly if you choose fruits that release more moisture, like peaches or apples. Enjoy experimenting with your favorite fruits!
How do I store leftover Upside-Down Orange Cake?
Storing your leftover Upside-Down Orange Cake is simple! First, let the cake cool completely. Then, cover it with plastic wrap or place it in an airtight container. You can keep it at room temperature for up to two days. If you want to store it for a longer period, consider refrigerating it. In the fridge, it can last for about a week. Just remember to bring it back to room temperature before serving for the best taste!
Can I make Upside-Down Orange Cake ahead of time?
Yes, you can definitely make the Upside-Down Orange Cake ahead of time! This cake actually tastes even better after a day or two, as the flavors have time to meld together. You can bake it a day in advance and store it as mentioned above. Just make sure to cover it well to keep it fresh. When you’re ready to serve, you can either enjoy it cold or warm it up slightly in the oven. Your guests will love this delicious treat, no matter when you serve it!
Conclusion on Upside-Down Orange Cake
In conclusion, the Upside-Down Orange Cake is a delightful dessert that combines the sweetness of caramelized oranges with a light and fluffy sponge cake. This recipe is not only easy to follow but also offers a burst of citrus flavor that can brighten any occasion. Whether you’re celebrating a special event or simply treating yourself, this cake is sure to impress.
Why You Should Try This Recipe Today
So, why wait? The Upside-Down Orange Cake is a fantastic way to showcase your baking skills while enjoying a delicious treat. Its vibrant colors and mouthwatering flavors make it a perfect centerpiece for any gathering. Plus, with the tips and variations provided, you can customize it to suit your taste and dietary needs.
Imagine the smiles on your friends’ and family’s faces as they take their first bite of this stunning cake. The combination of caramel and citrus is simply irresistible! So gather your ingredients, roll up your sleeves, and get ready to create a dessert that will leave everyone asking for seconds. Happy baking!
Craving more delectable desserts? Indulge in these mouthwatering creations:
- Chocolate Orange Cake: A Zesty Delight to Satisfy Your Sweet Tooth
- Divine Cocoa Serenade Cake: A Chocolate Lover’s Dream Come True
- Pineapple Upside-Down Cake Bars: A Must-Try Twist on a Classic Favorite
For more delightful recipes and culinary inspiration, follow us on Pinterest!