Introduction to Homemade Chocolate-Covered Ice Cream Bars
There’s something magical about ice cream bars, especially when they’re covered in rich chocolate. Homemade Chocolate-Covered Ice Cream Bars are not just a treat; they are a delightful experience. Imagine biting into a creamy ice cream bar, only to be met with a crunchy chocolate shell. It’s a perfect combination of textures and flavors that can brighten any day!
Why You Should Make Homemade Chocolate-Covered Ice Cream Bars
Making your own chocolate-covered ice cream bars is easier than you might think. First, you can customize them to suit your taste. Whether you prefer vanilla, chocolate, or even fruity flavors, the choice is yours! Plus, you can add your favorite toppings, like nuts or sprinkles, to make them even more special.
Another reason to whip up these delicious bars is the joy of creating something from scratch. It’s a fun activity for families, especially with kids. They can help scoop the ice cream, dip the bars, and sprinkle on the toppings. This not only makes for a fun kitchen experience but also creates lasting memories.
Moreover, these homemade treats are perfect for any occasion. Whether it’s a hot summer day, a birthday party, or just a cozy night in, chocolate-covered ice cream bars are sure to please everyone. They are a fantastic way to cool down and satisfy your sweet tooth.
So, gather your ingredients and get ready to make these delightful Homemade Chocolate-Covered Ice Cream Bars. You’ll be amazed at how simple and rewarding it is to create your own frozen treats!
Ingredients for Homemade Chocolate-Covered Ice Cream Bars
To create your own delicious Homemade Chocolate-Covered Ice Cream Bars, you’ll need a few simple ingredients. Each component plays a vital role in making these treats delightful and satisfying. Here’s what you’ll need:
- Vanilla ice cream or any preferred flavor: Choose your favorite ice cream flavor. Vanilla is classic, but chocolate, strawberry, or even mint can add a fun twist!
- Melting chocolate: You can use milk, dark, or white chocolate. Each type brings its unique taste and sweetness to the bars.
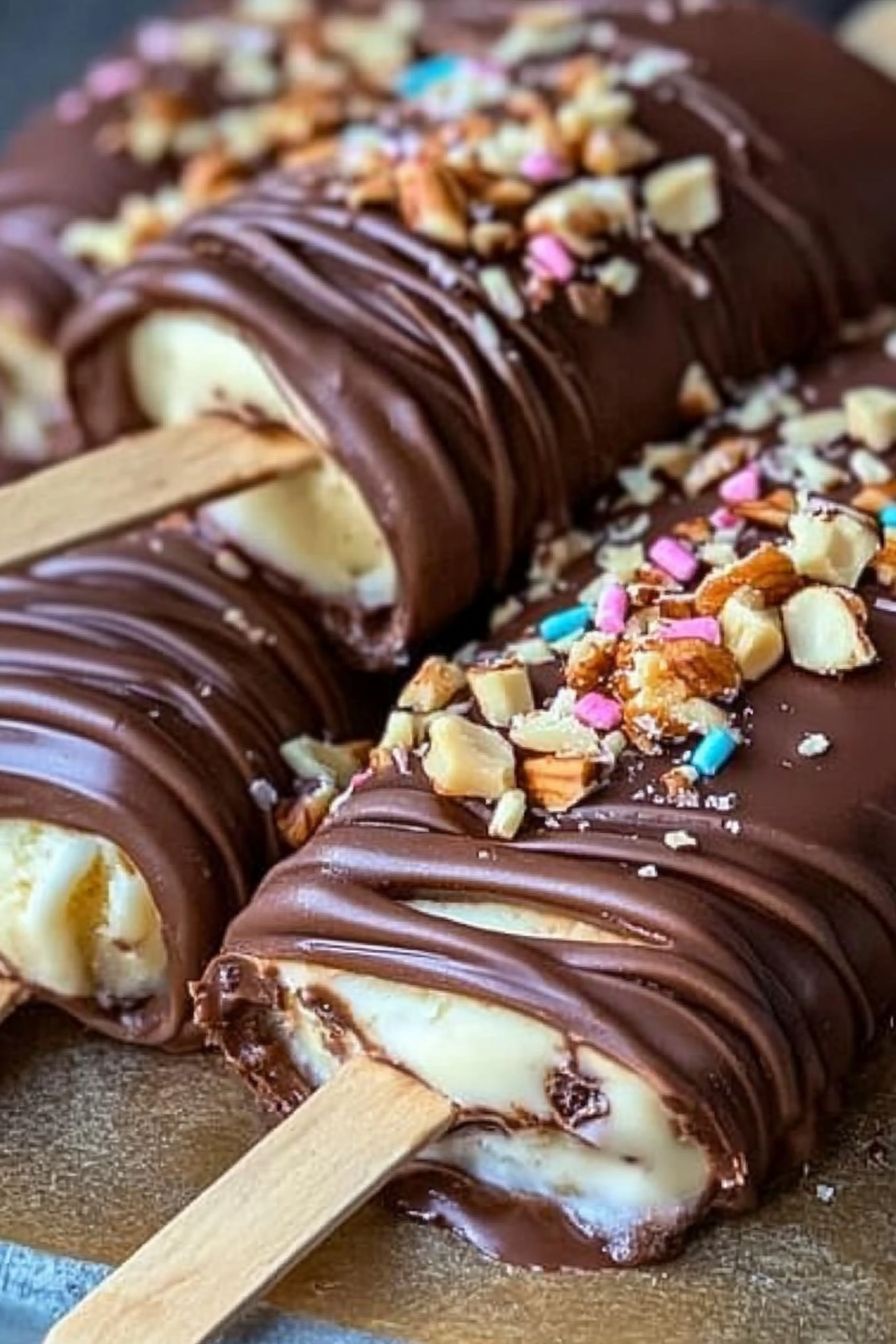
- Crushed nuts: Almonds, peanuts, or walnuts add a crunchy texture. They also provide a nutty flavor that complements the chocolate.
- Crushed cookies: Oreos or graham crackers can be used for a sweet crunch. They add a delightful contrast to the creamy ice cream.
- Sprinkles: Colorful sprinkles make your bars look festive and fun. They are perfect for parties or special occasions.
- Popsicle sticks: These are essential for holding your ice cream bars. They make it easy to dip and enjoy your treats!
Gather these ingredients, and you’re ready to start making your homemade chocolate-covered ice cream bars. The best part? You can mix and match flavors and toppings to create your perfect treat!
Step-by-Step Preparation of Homemade Chocolate-Covered Ice Cream Bars
Now that you have all your ingredients ready, it’s time to dive into the fun part: making your Homemade Chocolate-Covered Ice Cream Bars! Follow these simple steps to create your delicious treats.
Step 1: Prepare the Ice Cream Bars
First, scoop your vanilla ice cream into molds or shape them into bars using a spoon. If you’re using molds, fill them to the top for a nice, thick bar. If you’re shaping them by hand, aim for a rectangular shape, about the size of a standard ice cream bar. Once you have your bars ready, insert a popsicle stick into each one. This will make it easy to hold and dip later. Now, place the bars in the freezer and let them freeze until solid, which usually takes about 2-3 hours.
Step 2: Melt the Chocolate
While your ice cream bars are freezing, it’s time to melt the chocolate. Take a microwave-safe bowl and add your chosen melting chocolate. Heat it in the microwave in 30-second intervals. After each interval, stir the chocolate until it’s completely smooth. Be careful not to overheat it, as burnt chocolate can ruin your dipping experience. Once melted, set the bowl aside to cool slightly.
Step 3: Dip the Bars
Once your ice cream bars are frozen solid, it’s time to dip them in the melted chocolate. Carefully take each bar out of the freezer. Hold the popsicle stick and dip the bar into the chocolate, making sure to coat it fully. You can tilt the bowl to help cover the sides better. If you want a thicker chocolate layer, dip the bar a second time after the first layer sets for a few minutes.
Step 4: Add Toppings
Before the chocolate sets, it’s time to get creative with toppings! While the chocolate is still wet, sprinkle crushed nuts, cookies, or colorful sprinkles on top of the bars. This is where you can really personalize your treats. For a fun twist, consider drizzling some white chocolate over the top or adding crushed candies like toffee for extra sweetness.
Step 5: Refreeze
After adding your toppings, place the chocolate-dipped bars back in the freezer. Let them harden for another 30 minutes. This step is crucial for ensuring that the chocolate shell is firm and ready to enjoy. You’ll want to make sure they are completely frozen before serving.
Step 6: Enjoy
Once your bars are frozen solid, it’s time for the best part—enjoying your delicious homemade chocolate ice cream bars! Take them out of the freezer, and serve them right away. You can even cut them in half to share or to show off the beautiful layers inside. These treats are perfect for hot days, parties, or just a sweet snack at home!
Variations of Homemade Chocolate-Covered Ice Cream Bars
One of the best things about making Homemade Chocolate-Covered Ice Cream Bars is the endless possibilities for customization. You can easily switch up flavors and toppings to create a unique treat every time. Let’s explore some fun variations that will keep your taste buds excited!
Flavor Variations
While vanilla ice cream is a classic choice, don’t hesitate to experiment with different flavors. Here are some ideas:
- Chocolate Ice Cream: For chocolate lovers, use chocolate ice cream for a double chocolate delight. The rich flavor pairs perfectly with any chocolate coating.
- Strawberry Ice Cream: This fruity option adds a refreshing twist. The sweet and tangy flavor of strawberry ice cream contrasts beautifully with chocolate.
- Mint Chocolate Chip: If you enjoy mint, this flavor is a fantastic choice. The cool mint flavor combined with chocolate creates a refreshing treat.
- Coffee Ice Cream: For adults, coffee ice cream offers a sophisticated flavor. The bitterness of coffee complements the sweetness of the chocolate.
- Cookie Dough: This fun flavor includes chunks of cookie dough, making each bite a delightful surprise!
Feel free to mix and match flavors to find your perfect combination. The sky’s the limit when it comes to creating your ideal ice cream bar!
Topping Variations
Now that you have your ice cream flavor sorted, let’s talk about toppings. Here are some creative ideas to make your bars even more exciting:
- Chopped Fruits: Fresh fruits like strawberries, bananas, or raspberries can add a burst of flavor and color. Just sprinkle them on before the chocolate sets.
- Toasted Coconut: For a tropical twist, add toasted coconut flakes. They provide a chewy texture and a hint of sweetness.
- Mini Marshmallows: These fluffy treats can add a fun texture. They’re perfect for a s’mores-inspired ice cream bar!
- Caramel Drizzle: Drizzling caramel sauce over the chocolate adds a rich, gooey sweetness that’s hard to resist.
- Granola: For a crunchy and healthy option, sprinkle granola on top. It adds a nice crunch and a hint of nuttiness.
With these flavor and topping variations, you can create a new version of your Homemade Chocolate-Covered Ice Cream Bars every time. Get creative and have fun with it!
Cooking Note for Homemade Chocolate-Covered Ice Cream Bars
When making Homemade Chocolate-Covered Ice Cream Bars, a few cooking notes can help ensure your treats turn out perfectly every time. These tips will guide you through the process and enhance your overall experience.
First, always use high-quality melting chocolate. This will not only improve the taste but also ensure a smooth and shiny finish. If you prefer, you can also use chocolate chips, but make sure they are labeled as melting chocolate for the best results.
Next, be mindful of the temperature of your ice cream. If it’s too soft, the bars may lose their shape when you dip them in chocolate. Let the ice cream sit in the freezer for a bit longer if it feels too soft. On the other hand, if it’s too hard, it may be difficult to scoop and shape. Aim for a consistency that is firm yet scoopable.
When melting chocolate, avoid using water or steam, as even a small amount can cause the chocolate to seize. If this happens, it can become grainy and unusable. Instead, stick to the microwave method, stirring frequently to achieve a smooth texture.
Lastly, patience is key! Allow the chocolate to set completely before serving. This will ensure that your bars have a nice, firm coating that won’t melt away at the first bite. If you’re in a hurry, you can place them in the freezer for a few extra minutes to speed up the process.
By following these cooking notes, you’ll be well on your way to creating delicious and visually appealing Homemade Chocolate-Covered Ice Cream Bars that everyone will love!
Serving Suggestions for Homemade Chocolate-Covered Ice Cream Bars
Once your Homemade Chocolate-Covered Ice Cream Bars are ready, it’s time to think about how to serve them. These delightful treats can be enjoyed in various ways, making them perfect for any occasion. Here are some fun serving suggestions to elevate your dessert experience:
- On a Dessert Platter: Arrange your ice cream bars on a colorful dessert platter. This not only makes for an eye-catching display but also allows guests to choose their favorite flavors and toppings.
- With Fresh Fruit: Serve your bars alongside fresh fruit like strawberries, blueberries, or banana slices. The fruity flavors complement the rich chocolate and creamy ice cream beautifully.
- With Dipping Sauces: Offer a variety of dipping sauces, such as caramel, chocolate syrup, or fruit sauces. Guests can dip their bars for an extra layer of flavor and fun!
- As Part of a Sundae Bar: Create a sundae bar with your ice cream bars as the main attraction. Provide toppings like whipped cream, nuts, and cherries for a complete sundae experience.
- In a Party Setting: For parties, consider making mini versions of your ice cream bars. Cut them into smaller pieces and serve them on skewers for easy handling. This way, guests can enjoy a variety of flavors without feeling too full.
These serving suggestions will not only enhance the presentation of your Homemade Chocolate-Covered Ice Cream Bars but also make them more enjoyable for everyone. Whether it’s a casual family gathering or a festive celebration, these treats are sure to impress!
Tips for Perfect Homemade Chocolate-Covered Ice Cream Bars
Creating the perfect Homemade Chocolate-Covered Ice Cream Bars is all about the details. With a few helpful tips, you can ensure that your treats turn out delicious and visually appealing every time. Here are some essential tips to keep in mind:
- Choose the Right Ice Cream: Opt for a high-quality ice cream that has a creamy texture. This will help your bars hold their shape and provide a delightful mouthfeel. Avoid ice creams that are too soft or airy, as they may not freeze well.
- Freeze Thoroughly: Make sure your ice cream bars are completely frozen before dipping them in chocolate. This prevents the bars from melting and losing their shape during the dipping process. A solid freeze for at least 2-3 hours is ideal.
- Use a Deep Bowl for Dipping: When melting chocolate, use a deep bowl. This allows you to dip the bars fully without leaving any spots uncovered. A deeper bowl also makes it easier to coat the bars evenly.
- Work Quickly: Chocolate can set quickly, so work fast when dipping and adding toppings. If the chocolate starts to harden, you can reheat it in the microwave for a few seconds to regain its smooth consistency.
- Experiment with Temperatures: If you find that your chocolate is too thick for dipping, try warming it slightly. Conversely, if it’s too thin, let it cool a bit before dipping. Finding the right temperature will help achieve a perfect coating.
- Layering Toppings: For a more exciting texture, consider layering your toppings. Start with a base layer of crushed nuts, then add sprinkles or cookie crumbs on top. This creates a beautiful and delicious combination.
- Store Properly: To keep your ice cream bars fresh, store them in an airtight container in the freezer. This prevents freezer burn and keeps them tasting great. They can last for up to two weeks if stored correctly.
By following these tips, you’ll be well on your way to making perfect Homemade Chocolate-Covered Ice Cream Bars that are sure to impress your family and friends. Enjoy the process and have fun experimenting with flavors and toppings!
Breakdown of Time for Homemade Chocolate-Covered Ice Cream Bars
Understanding the time it takes to make Homemade Chocolate-Covered Ice Cream Bars can help you plan better. Here’s a simple breakdown of the time involved in each step of the process. This way, you can enjoy your delicious treats without any surprises!
Prep Time
The prep time for these delightful ice cream bars is about 20 minutes. This includes gathering your ingredients, scooping the ice cream, and preparing the chocolate for melting. It’s a quick and easy process that gets you one step closer to enjoying your homemade treats!
Cooking Time
While there’s no actual cooking involved, the melting of the chocolate takes a few minutes. You’ll spend about 5-10 minutes melting the chocolate in the microwave. Just remember to do it in 30-second intervals, stirring in between to achieve a smooth consistency.
Total Time
The total time for making these ice cream bars is approximately 3 hours and 50 minutes. This includes the freezing time of 2-3 hours for the ice cream bars to solidify and an additional 30 minutes for the chocolate coating to harden after dipping. While it may seem like a long wait, the end result is well worth it!
In summary, you’ll spend about 20 minutes preparing, 5-10 minutes melting chocolate, and a total of 3 hours and 50 minutes from start to finish. With this breakdown, you can easily plan your ice cream bar-making adventure!
Nutritional Information for Homemade Chocolate-Covered Ice Cream Bars
When indulging in delicious Homemade Chocolate-Covered Ice Cream Bars, it’s helpful to know the nutritional content. Understanding what’s in your treats can help you enjoy them even more. Here’s a breakdown of the key nutritional information for each bar:
Calories
Each Homemade Chocolate-Covered Ice Cream Bar contains approximately 200 calories. This makes them a delightful treat without being overly indulgent. Enjoying one bar can satisfy your sweet tooth while keeping your calorie intake in check.
Protein
These ice cream bars provide about 3 grams of protein per serving. The protein comes mainly from the ice cream, which is a good source of dairy. While they aren’t a high-protein snack, they do offer a little boost, making them a fun treat to enjoy after a meal or during a hot day.
Sodium
Each bar contains roughly 80 milligrams of sodium. This amount is relatively low, making these ice cream bars a suitable option for those watching their sodium intake. However, it’s always good to enjoy treats in moderation, especially if you have specific dietary needs.
In summary, Homemade Chocolate-Covered Ice Cream Bars are a tasty treat that can fit into a balanced diet. With 200 calories, 3 grams of protein, and 80 milligrams of sodium per bar, you can enjoy these delightful desserts without guilt. So go ahead, treat yourself to a homemade ice cream bar today!
FAQs about Homemade Chocolate-Covered Ice Cream Bars
Can I use different flavors of ice cream?
Absolutely! One of the best parts of making Homemade Chocolate-Covered Ice Cream Bars is the ability to customize them. You can use any flavor of ice cream you like. Whether you prefer classic vanilla, rich chocolate, fruity strawberry, or even unique flavors like mint chocolate chip or coffee, the choice is yours. Each flavor will bring its own delightful twist to your chocolate-covered bars!
How long do these ice cream bars last in the freezer?
When stored properly, your Homemade Chocolate-Covered Ice Cream Bars can last in the freezer for up to two weeks. To keep them fresh, place them in an airtight container or wrap them individually in plastic wrap. This will help prevent freezer burn and keep them tasting delicious. Just remember to enjoy them within that time frame for the best flavor and texture!
What type of chocolate is best for dipping?
For dipping your ice cream bars, high-quality melting chocolate is the best choice. You can use milk, dark, or white chocolate, depending on your preference. Melting chocolate is specifically designed to create a smooth and shiny coating. If you prefer, chocolate chips can also work, but make sure they are labeled as melting chocolate for the best results. Each type of chocolate will give your bars a unique flavor, so feel free to experiment!
Can I make these ice cream bars without popsicle sticks?
Yes, you can make Homemade Chocolate-Covered Ice Cream Bars without popsicle sticks! If you don’t have them on hand, you can simply shape the ice cream into bars and freeze them. When it’s time to dip, you can use a fork or tongs to hold the bars while coating them in chocolate. Just be careful when dipping to avoid breaking the bars. However, using popsicle sticks does make it easier to enjoy your treats!
Conclusion on Homemade Chocolate-Covered Ice Cream Bars
In conclusion, Homemade Chocolate-Covered Ice Cream Bars are a delightful treat that everyone can enjoy. They are not only easy to make but also allow for endless customization. Whether you prefer classic vanilla or adventurous flavors, the choice is yours. The fun of adding toppings like crushed nuts, sprinkles, or even drizzles of caramel makes each bar unique.
These ice cream bars are perfect for any occasion, from summer parties to cozy family nights. They bring joy and satisfaction with every bite. Plus, making them together as a family can create wonderful memories in the kitchen. So, gather your ingredients, invite your loved ones, and start creating your own delicious chocolate-covered ice cream bars!
Remember, the key to a great homemade treat is to have fun and be creative. Don’t hesitate to experiment with different flavors and toppings. With a little imagination, you can turn a simple dessert into a masterpiece. Enjoy your homemade chocolate-covered ice cream bars, and share the joy with friends and family!