Introduction to Oreo Chocolate Cake
What Makes Oreo Chocolate Cake Special?
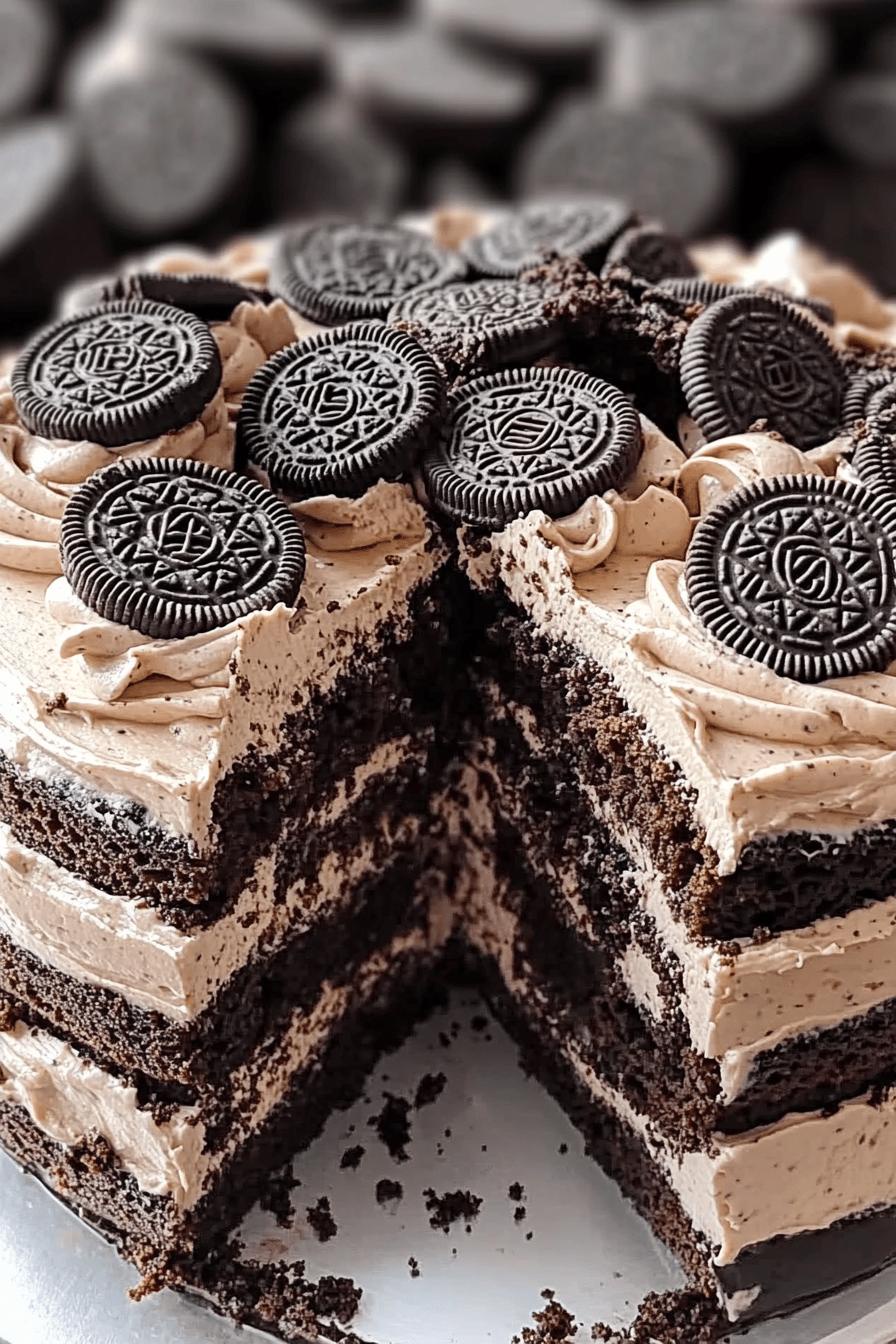
Oreo Chocolate Cake is not just any dessert; it’s a delightful fusion of flavors that brings joy to every bite. The combination of rich chocolate cake and creamy cookies & cream frosting creates a taste sensation that’s hard to resist. Each layer of this cake is infused with the beloved Oreo cookie flavor, making it a standout choice for dessert lovers. The addition of a luscious chocolate ganache on top adds an extra layer of indulgence, ensuring that every slice is a treat. Whether you’re a fan of chocolate or cookies, this cake has something special for everyone.
The Perfect Dessert for Any Occasion
This Oreo Chocolate Cake is incredibly versatile, making it suitable for various occasions. Whether you’re celebrating a birthday, hosting a party, or simply treating yourself, this cake fits the bill perfectly. Its eye-catching layers and rich flavors make it a showstopper at any gathering. Plus, it’s easy to customize! You can add sprinkles for a festive touch or serve it with a scoop of ice cream for an extra special dessert experience. No matter the event, this cake is sure to impress your guests and leave them wanting more.
Ingredients for Oreo Chocolate Cake
To create the delicious Oreo Chocolate Cake, you’ll need a selection of simple yet essential ingredients. Each component plays a vital role in achieving that rich, chocolatey flavor and creamy texture. Here’s what you’ll need:
For the Chocolate Cake Layers:
- 1 ¾ cups all-purpose flour
- 1 ¾ cups granulated sugar
- ¾ cup unsweetened cocoa powder
- 1 ½ teaspoons baking powder
- 1 ½ teaspoons baking soda
- 1 teaspoon salt
- 2 large eggs
- 1 cup whole milk
- ½ cup vegetable oil
- 2 teaspoons vanilla extract
- 1 cup boiling water
For the Cookies & Cream Frosting:
- 1 cup unsalted butter, softened
- 4 cups powdered sugar
- ½ cup heavy cream
- 1 teaspoon vanilla extract
- 1 cup crushed Oreo cookies
For the Chocolate Ganache Topping:
- 1 cup semi-sweet chocolate chips
- ½ cup heavy cream
These ingredients come together to create a cake that is not only visually stunning but also bursting with flavor. Make sure to gather everything before you start baking to ensure a smooth preparation process. Now that you have your ingredients ready, let’s move on to the step-by-step preparation of this delightful Oreo Chocolate Cake!
Step-by-Step Preparation of Oreo Chocolate Cake
Step 1: Preparing the Chocolate Cake Batter
To start, preheat your oven to 350°F (175°C). This ensures that your cake bakes evenly. In a large mixing bowl, combine the all-purpose flour, granulated sugar, cocoa powder, baking powder, baking soda, and salt. Whisk these dry ingredients together until they are well mixed. Next, add the eggs, whole milk, vegetable oil, and vanilla extract. Mix everything together until the batter is smooth. Finally, carefully stir in the boiling water. This step makes the batter thin, but it’s essential for a moist cake. Once your batter is ready, it’s time to move on to baking!
Step 2: Baking the Cake Layers
Grease and flour two 9-inch round cake pans. This will help the cakes come out easily after baking. Pour the prepared batter evenly into the pans. Bake in the preheated oven for about 30-35 minutes. To check if they are done, insert a toothpick into the center of the cakes. If it comes out clean, they are ready! Once baked, remove the pans from the oven and let them cool for about 10 minutes. Then, carefully transfer the cakes to a wire rack to cool completely. This cooling step is crucial for the frosting to stick later on.
Step 3: Making the Cookies & Cream Frosting
While the cakes are cooling, let’s prepare the cookies & cream frosting. In a large bowl, beat the softened unsalted butter until it’s creamy. Gradually add the powdered sugar, mixing well after each addition. Pour in the heavy cream and vanilla extract, then beat until the frosting is light and fluffy. Finally, fold in the crushed Oreo cookies. This will give your frosting that delightful cookies & cream flavor. Set the frosting aside until the cake layers are completely cool.
Step 4: Assembling the Oreo Chocolate Cake
Once the cake layers are cool, it’s time to assemble your Oreo Chocolate Cake. Place one layer of the chocolate cake on a serving plate. Spread a generous amount of cookies & cream frosting on top. Then, carefully place the second layer on top of the frosting. Use the remaining frosting to cover the top and sides of the cake. Make sure to smooth it out for a beautiful finish. Don’t worry about perfection; a little rustic charm adds to the cake’s appeal!
Step 5: Adding the Chocolate Ganache Topping
Now for the final touch! To make the chocolate ganache, heat the heavy cream in a small saucepan over medium heat until it just begins to simmer. Remove it from the heat and add the semi-sweet chocolate chips. Stir until the chocolate is completely melted and the mixture is smooth. Allow the ganache to cool slightly before pouring it over the top of the frosted cake. Let it drip down the sides for a stunning effect. Once done, your Oreo Chocolate Cake is ready to be served!
Variations of Oreo Chocolate Cake
Gluten-Free Oreo Chocolate Cake
If you or your guests are gluten-sensitive, you can still enjoy this delicious Oreo Chocolate Cake! To make a gluten-free version, simply substitute the all-purpose flour with a gluten-free flour blend. Many brands offer a 1:1 gluten-free flour that works perfectly in baking. Additionally, ensure that your baking powder is gluten-free. The rest of the ingredients remain the same, allowing you to savor the rich chocolate and creamy frosting without worry. This variation ensures that everyone can indulge in this decadent dessert!
Vegan Oreo Chocolate Cake Options
For those following a vegan diet, you can easily adapt the Oreo Chocolate Cake recipe. Start by replacing the eggs with flaxseed meal or applesauce. For each egg, mix 1 tablespoon of flaxseed meal with 2.5 tablespoons of water and let it sit for a few minutes until it thickens. Use almond milk or any plant-based milk instead of whole milk. Additionally, choose a vegetable oil that is vegan-friendly. For the frosting, use vegan butter and coconut cream in place of heavy cream. With these simple swaps, you can create a delightful vegan Oreo Chocolate Cake that everyone will love!
Cooking Note for Oreo Chocolate Cake
When baking the Oreo Chocolate Cake, there are a few important cooking notes to keep in mind. First, always preheat your oven before starting the baking process. This ensures that your cake bakes evenly and rises properly. Using an oven thermometer can help you confirm that your oven is at the right temperature.
Next, be mindful of the mixing process. Overmixing the batter can lead to a dense cake, so mix just until the ingredients are combined. Additionally, when measuring your flour, spoon it into the measuring cup and level it off with a knife. This prevents packing, which can result in too much flour and a dry cake.
Another tip is to let your cakes cool completely before frosting. If the cakes are warm, the frosting may melt and slide off, ruining the beautiful layers. For best results, allow the cakes to cool on a wire rack for at least an hour.
Lastly, when making the chocolate ganache, be sure to let it cool slightly before pouring it over the cake. If it’s too hot, it may melt the frosting underneath. A perfectly cooled ganache will create a beautiful, glossy finish that enhances the overall look of your Oreo Chocolate Cake.
By following these cooking notes, you’ll ensure that your cake turns out perfectly every time. Happy baking!
Serving Suggestions for Oreo Chocolate Cake
Pairing with Ice Cream or Whipped Cream
When it comes to serving your Oreo Chocolate Cake, pairing it with ice cream or whipped cream can elevate the dessert experience. A scoop of vanilla ice cream complements the rich chocolate flavors beautifully. The cold, creamy texture of the ice cream contrasts perfectly with the moist cake and fluffy frosting. You can also try other flavors like cookies and cream or chocolate for an extra indulgent treat!
If you prefer whipped cream, a dollop on top of each slice adds a light and airy touch. You can even sweeten the whipped cream with a bit of powdered sugar and vanilla extract for added flavor. For a fun twist, consider adding crushed Oreos on top of the whipped cream for a delightful crunch. This combination not only enhances the taste but also makes for a visually appealing dessert that will impress your guests.
Creative Presentation Ideas
Presentation is key when serving your Oreo Chocolate Cake. A beautifully presented cake can make any occasion feel special. Here are some creative ideas to make your cake stand out:
- Layered Slices: When cutting the cake, serve each slice with a layer of frosting visible. This showcases the delicious layers and makes each piece look inviting.
- Garnish with Oreos: Crushed Oreos sprinkled on top of the ganache or around the base of the cake adds a decorative touch. You can also place whole Oreos on top for a fun and playful look.
- Chocolate Drizzle: For an extra touch of elegance, drizzle some melted chocolate over the top of the cake before serving. This adds a glossy finish and enhances the chocolate flavor.
- Serve on a Cake Stand: Presenting your cake on a decorative cake stand can elevate its appearance. Choose a stand that complements the theme of your event for a polished look.
With these serving suggestions, your Oreo Chocolate Cake will not only taste amazing but also look stunning on the dessert table. Enjoy sharing this delightful treat with family and friends!
Tips for Perfecting Your Oreo Chocolate Cake
Common Mistakes to Avoid
When baking your Oreo Chocolate Cake, avoiding common mistakes can make a big difference in the final result. Here are some pitfalls to watch out for:
- Not Preheating the Oven: Always preheat your oven before baking. This ensures that your cake rises properly and bakes evenly.
- Overmixing the Batter: Mixing too much can lead to a dense cake. Mix just until the ingredients are combined for a light and fluffy texture.
- Incorrect Measurements: Baking is a science! Use precise measurements for your ingredients. Spoon flour into the measuring cup and level it off for accuracy.
- Skipping the Cooling Time: Allow your cake layers to cool completely before frosting. If they’re warm, the frosting may melt and slide off.
- Using Cold Ingredients: Make sure your eggs and milk are at room temperature. This helps create a smoother batter and better texture.
By keeping these tips in mind, you’ll be on your way to baking a perfect Oreo Chocolate Cake that everyone will love!
Storage Tips for Leftover Cake
After enjoying your delicious Oreo Chocolate Cake, you might have some leftovers. Here’s how to store them properly:
- Room Temperature: If you plan to eat the cake within a couple of days, store it in an airtight container at room temperature. This keeps it fresh and moist.
- Refrigeration: For longer storage, place the cake in the fridge. Cover it with plastic wrap or store it in an airtight container to prevent it from drying out.
- Freezing: If you want to keep the cake for an extended period, you can freeze it. Wrap individual slices in plastic wrap and then place them in a freezer-safe bag. This way, you can enjoy a slice whenever you crave it!
When ready to enjoy your leftover cake, simply thaw it in the refrigerator or at room temperature. With these storage tips, your Oreo Chocolate Cake will remain delicious for days to come!
Breakdown of Time for Oreo Chocolate Cake
Prep Time
Preparing your Oreo Chocolate Cake is a fun and engaging process! The prep time typically takes about 30 minutes. During this time, you’ll gather all your ingredients, mix the cake batter, and prepare the cookies & cream frosting. Make sure to measure everything accurately to ensure a smooth baking experience. This initial step sets the stage for a delicious cake!
Cooking Time
The cooking time for the cake layers is approximately 30-35 minutes. While the cakes are baking, you can clean up your kitchen or prepare the frosting. Once the cakes are done, allow them to cool for about 10 minutes in the pans before transferring them to a wire rack. This cooling period is essential for achieving the perfect texture and flavor.
Total Time
In total, you can expect to spend around 1 hour and 15 minutes to 1 hour and 20 minutes from start to finish. This includes prep time, cooking time, and cooling time. With a little patience and attention to detail, you’ll have a stunning Oreo Chocolate Cake ready to impress your family and friends. Enjoy the process, and happy baking!
Nutritional Information for Oreo Chocolate Cake
Calories and Macronutrients
Understanding the nutritional content of your Oreo Chocolate Cake can help you enjoy it mindfully. A typical slice of this decadent dessert (about 1/12 of the cake) contains approximately 400-450 calories. Here’s a breakdown of the macronutrients:
- Calories: 400-450
- Protein: 4-6 grams
- Carbohydrates: 60-65 grams
- Fat: 20-25 grams
- Sugar: 30-35 grams
These values can vary based on the specific ingredients used and portion sizes. For instance, using less sugar or opting for low-fat dairy can slightly reduce the calorie count. However, the rich flavors and textures of this cake make it a delightful treat worth savoring!
Health Considerations
While Oreo Chocolate Cake is undeniably delicious, it’s important to enjoy it in moderation. The cake is high in sugar and fat, which can contribute to excess calorie intake if consumed frequently. Here are a few health considerations to keep in mind:
- Moderation is Key: Enjoying a slice on special occasions is perfectly fine. Balance it with healthier meals throughout the day.
- Allergies and Dietary Restrictions: Be mindful of any allergies, especially to gluten or dairy. The recipe can be adapted to meet gluten-free or vegan needs, as mentioned earlier.
- Portion Control: Consider serving smaller slices to help manage calorie intake while still enjoying the cake.
- Pairing Wisely: If you serve the cake with ice cream or whipped cream, be aware of the additional calories. Opt for lighter toppings if desired.
By keeping these health considerations in mind, you can indulge in your Oreo Chocolate Cake while maintaining a balanced approach to your diet. Enjoy every bite of this delightful dessert!
FAQs about Oreo Chocolate Cake
Can I make Oreo Chocolate Cake ahead of time?
Absolutely! Making Oreo Chocolate Cake ahead of time is a great idea, especially for special occasions. You can bake the cake layers a day in advance. Just make sure to let them cool completely before wrapping them in plastic wrap. Store the layers in the refrigerator to keep them fresh. You can also prepare the cookies & cream frosting ahead of time. Just store it in an airtight container in the fridge. When you’re ready to serve, simply assemble the cake and add the chocolate ganache. This way, you can enjoy the cake without the last-minute rush!
What can I substitute for Oreos in this recipe?
If you don’t have Oreos or want to try something different, there are several substitutes you can use. For the cookies & cream flavor, you can use any chocolate sandwich cookies available. Brands like Hydrox or even generic store brands work well. If you prefer a different flavor, consider using chocolate graham crackers mixed with a bit of cream cheese for a unique twist. Just remember that the flavor and texture may vary slightly, but the cake will still be delicious!
How do I store leftover Oreo Chocolate Cake?
Storing leftover Oreo Chocolate Cake is easy! If you have any slices left, place them in an airtight container. You can keep the cake at room temperature for a couple of days if you plan to eat it soon. For longer storage, refrigerate the cake. Make sure to cover it well to prevent it from drying out. If you want to keep it for an extended period, you can freeze individual slices. Wrap each slice in plastic wrap and place them in a freezer-safe bag. This way, you can enjoy a slice whenever you crave it!
Can I freeze Oreo Chocolate Cake?
Yes, you can freeze Oreo Chocolate Cake! Freezing is a great way to preserve its deliciousness for later. To freeze the cake, first, let it cool completely. Then, wrap the entire cake or individual slices tightly in plastic wrap. After that, place them in a freezer-safe container or bag. When you’re ready to enjoy it, simply thaw the cake in the refrigerator overnight or at room temperature for a few hours. This way, you can savor the rich flavors of your Oreo Chocolate Cake even after some time!
Conclusion on Oreo Chocolate Cake
Final Thoughts on This Decadent Dessert
In conclusion, the Oreo Chocolate Cake is a delightful treat that combines rich chocolate flavors with the beloved taste of Oreos. This cake is not only visually stunning but also incredibly delicious, making it a perfect choice for any occasion. Whether you’re celebrating a birthday, hosting a gathering, or simply indulging in a sweet craving, this cake is sure to impress.
With its layers of moist chocolate cake, fluffy cookies & cream frosting, and a glossy chocolate ganache, every bite is a celebration of flavor. Plus, the variations for gluten-free and vegan options ensure that everyone can enjoy this decadent dessert. Remember, baking is all about having fun and experimenting, so don’t hesitate to make this recipe your own!
As you embark on your baking journey, keep in mind the tips and tricks shared throughout this article. They will help you avoid common mistakes and ensure that your Oreo Chocolate Cake turns out perfectly every time. So gather your ingredients, preheat that oven, and get ready to create a dessert that will leave everyone asking for seconds!
Enjoy the process, and most importantly, enjoy every delicious slice of your Oreo Chocolate Cake. Happy baking!
Relevant Recipes Link:
Indulge in more decadent dessert recipes like these irresistible options:
For more delightful recipes and culinary inspiration, follow us on Pinterest!