Introduction to Oreo Chocolate Gelatin: An Irresistible Dessert
Are you ready to treat yourself to something truly special? Look no further than Oreo Chocolate Gelatin! This delightful dessert combines the rich, creamy taste of chocolate with the beloved crunch of Oreo cookies. It’s a match made in dessert heaven! Whether you’re hosting a party, celebrating a birthday, or simply craving something sweet, this dessert is sure to impress.
What Makes Oreo Chocolate Gelatin Special?
Oreo Chocolate Gelatin stands out for several reasons. First, it’s incredibly easy to make. You don’t need to be a master chef to whip up this delicious treat. With just a few simple ingredients, you can create a dessert that looks and tastes gourmet. The layers of chocolate gelatin and crushed Oreos create a beautiful contrast, making it visually appealing as well.
Moreover, the combination of flavors is simply irresistible. The smooth chocolate gelatin melts in your mouth, while the crunchy Oreo pieces add texture and a burst of flavor. This dessert is not just about taste; it’s an experience! Each bite offers a delightful mix of creamy and crunchy, sweet and rich. It’s a dessert that everyone will love, from kids to adults.
The Perfect Dessert for Any Occasion
Oreo Chocolate Gelatin is versatile enough for any occasion. Planning a summer barbecue? This dessert is a refreshing treat that will cool you down. Hosting a family gathering? It’s a crowd-pleaser that will have everyone asking for seconds. Even if you’re just enjoying a quiet night at home, this dessert is perfect for satisfying your sweet tooth.
Additionally, it’s a no-bake dessert, which means you can prepare it without turning on the oven. This makes it ideal for hot days when you want something sweet but don’t want to heat up your kitchen. Plus, it can be made ahead of time, allowing you to enjoy your event without the stress of last-minute preparations.
In summary, Oreo Chocolate Gelatin is not just a dessert; it’s a delightful experience that brings joy to any occasion. So, let’s dive into the ingredients and get started on making this irresistible treat!
Ingredients for Oreo Chocolate Gelatin: An Irresistible Dessert
To create the delicious Oreo Chocolate Gelatin, you’ll need a few simple ingredients. Each one plays a vital role in making this dessert a delightful treat. Here’s what you’ll need:
- 1 package (3 oz) of chocolate gelatin
- 2 cups of boiling water
- 1 cup of cold water
- 1 cup of heavy cream
- 1/2 cup of powdered sugar
- 1 teaspoon of vanilla extract
- 15-20 Oreo cookies, crushed
- Extra Oreo cookies for garnish (optional)
These ingredients are easy to find at your local grocery store. The chocolate gelatin provides a rich base, while the crushed Oreos add that signature crunch. The heavy cream, combined with powdered sugar and vanilla, creates a luscious whipped topping that complements the dessert perfectly.
Feel free to get creative! You can adjust the amount of Oreos based on your preference. If you love the cookie flavor, add more! The same goes for the whipped cream; a little extra never hurts. Now that you have your ingredients ready, let’s move on to the step-by-step preparation of this irresistible dessert!
Step-by-Step Preparation of Oreo Chocolate Gelatin: An Irresistible Dessert
Now that you have all your ingredients ready, it’s time to dive into the fun part—preparing your Oreo Chocolate Gelatin! Follow these simple steps to create a dessert that will wow your family and friends.
Step 1: Preparing the Chocolate Gelatin
First, let’s get started with the chocolate gelatin. In a medium-sized bowl, pour in the package of chocolate gelatin. Next, carefully add 2 cups of boiling water. Stir the mixture well until the gelatin is completely dissolved. This step is crucial, as it ensures a smooth texture for your dessert. Once dissolved, add 1 cup of cold water to the mixture. Stir again to combine everything. Set the bowl aside to cool slightly while you prepare the next steps.
Step 2: Crushing the Oreo Cookies
While the gelatin cools, it’s time to crush those Oreo cookies! Take 15-20 Oreo cookies and place them in a zip-top bag. Seal the bag tightly, making sure to remove as much air as possible. Using a rolling pin or your hands, crush the cookies into small pieces. You want a mix of fine crumbs and larger chunks for added texture. If you prefer, you can also use a food processor for this step. Just pulse the cookies until you reach your desired consistency. Set the crushed Oreos aside for layering.
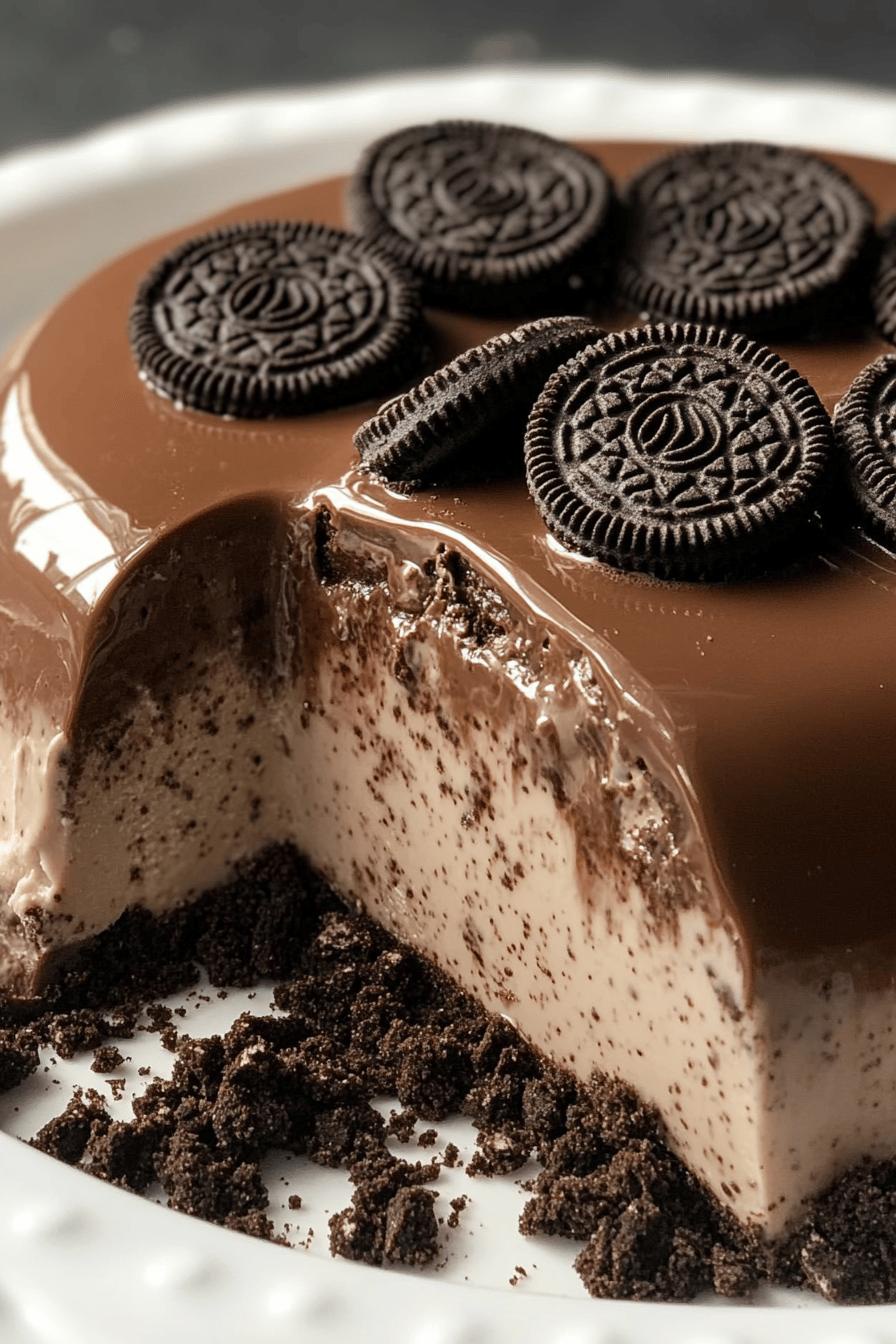
Step 3: Layering the Ingredients
Now comes the fun part—layering! Grab a clear glass dish or individual serving cups for a beautiful presentation. Start by pouring a layer of the chocolate gelatin into the bottom of your dish. Use just enough to cover the bottom. Next, sprinkle a generous layer of the crushed Oreo cookies over the gelatin. This will create a delightful crunch in every bite. Repeat this process, alternating between layers of chocolate gelatin and crushed Oreos, until you reach the top of your dish. Finish with a final layer of chocolate gelatin.
Step 4: Chilling the Dessert
Once you’ve completed the layering, it’s time to chill your dessert. Cover the dish with plastic wrap or a lid to prevent any odors from the fridge affecting the flavor. Place the dessert in the refrigerator for at least 4 hours, or until the gelatin is fully set. This chilling time allows the flavors to meld together beautifully. If you’re in a hurry, you can chill it for a minimum of 2 hours, but the longer, the better!
After the chilling time is up, your Oreo Chocolate Gelatin will be ready to serve. Just imagine the delight on everyone’s faces when they see this stunning dessert! Now, let’s explore some variations to make this treat even more exciting.
Variations of Oreo Chocolate Gelatin: An Irresistible Dessert
While the classic Oreo Chocolate Gelatin is already a delightful treat, there are many ways to mix things up! By adding different flavors or toppings, you can create a unique dessert that suits your taste. Let’s explore some fun variations that will take your dessert to the next level.
Adding Different Flavors
Why stick to just chocolate when you can explore a world of flavors? Here are some ideas to get you started:
- Vanilla Gelatin: Swap out the chocolate gelatin for vanilla. This will give your dessert a lighter taste while still pairing beautifully with the Oreos.
- Strawberry Gelatin: For a fruity twist, use strawberry gelatin. The sweet and tangy flavor will complement the Oreos perfectly.
- Mint Chocolate: Add a few drops of mint extract to your chocolate gelatin for a refreshing minty flavor. This variation is perfect for mint lovers!
- Peanut Butter: Mix in some creamy peanut butter with the chocolate gelatin for a rich, nutty flavor. It’s a match made in dessert heaven!
Feel free to experiment with other flavors as well. The possibilities are endless, and you might just discover a new favorite!
Alternative Toppings and Mix-ins
In addition to changing the gelatin flavor, you can also enhance your Oreo Chocolate Gelatin with various toppings and mix-ins. Here are some tasty ideas:
- Whipped Cream: Top your dessert with a generous dollop of whipped cream for added creaminess. You can even sprinkle some crushed Oreos on top for extra crunch!
- Chocolate Chips: Add mini chocolate chips between the layers or on top for a delightful chocolatey surprise.
- Fresh Fruit: Consider adding fresh berries, like strawberries or raspberries, for a pop of color and freshness.
- Caramel Sauce: Drizzle some caramel sauce over the top for a sweet and gooey finish.
These variations not only enhance the flavor but also make your dessert visually appealing. So, don’t hesitate to get creative and make this dessert your own!
Cooking Note for Oreo Chocolate Gelatin: An Irresistible Dessert
When making Oreo Chocolate Gelatin, a few cooking notes can help ensure your dessert turns out perfectly every time. These tips will guide you through the process and help you avoid common pitfalls.
First, always check the expiration date on your gelatin package. Using fresh gelatin is crucial for achieving the right texture. If your gelatin is expired, it may not set properly, leading to a runny dessert.
Next, when dissolving the gelatin in boiling water, make sure to stir thoroughly. This step is essential for ensuring that all the gelatin granules dissolve completely. If any granules remain, they can create a grainy texture in your dessert.
Additionally, be mindful of the temperature of your cold water. Using ice-cold water can help the gelatin set faster, but it’s important not to add ice directly to the mixture. Ice can dilute the gelatin and affect its consistency. Instead, use cold tap water for the best results.
When layering the ingredients, allow the chocolate gelatin to cool slightly before pouring it over the crushed Oreos. If the gelatin is too hot, it can melt the cookies, resulting in a less appealing texture. Aim for a temperature that is warm but not steaming.
Lastly, patience is key when chilling your dessert. While it may be tempting to cut into it early, allowing the gelatin to set for the full recommended time will yield the best results. This ensures that each layer holds its shape and provides a delightful experience with every bite.
By following these cooking notes, you’ll be well on your way to creating a stunning and delicious Oreo Chocolate Gelatin that will impress everyone at your gathering!
Serving Suggestions for Oreo Chocolate Gelatin: An Irresistible Dessert
Once your Oreo Chocolate Gelatin is ready, it’s time to think about how to serve it! Presentation can elevate your dessert from simple to spectacular. Here are some creative serving suggestions that will make your dessert the star of the show.
Presentation Ideas
When it comes to serving Oreo Chocolate Gelatin, the way you present it can make a big difference. Here are some fun ideas:
- Individual Cups: Serve the dessert in clear plastic or glass cups. This allows guests to see the beautiful layers of chocolate and Oreos. Plus, it makes for easy serving!
- Layered Trifle: Use a large glass trifle bowl to create a stunning centerpiece. Layer the chocolate gelatin and crushed Oreos, and top with whipped cream and extra Oreos for a show-stopping dessert.
- Garnish with Fresh Mint: Add a sprig of fresh mint on top of each serving for a pop of color and a hint of freshness. It’s a simple touch that looks elegant.
- Chocolate Drizzle: Drizzle some melted chocolate over the top before serving. This adds a rich touch and makes the dessert even more tempting.
These presentation ideas not only enhance the visual appeal but also make your dessert feel special. Remember, we eat with our eyes first!
Pairing with Other Desserts
Oreo Chocolate Gelatin is delicious on its own, but it can also be paired with other desserts for a delightful dessert spread. Here are some pairing suggestions:
- Ice Cream: Serve a scoop of vanilla or chocolate ice cream alongside your gelatin. The creamy texture complements the dessert perfectly.
- Fruit Salad: A light fruit salad can balance the richness of the Oreo Chocolate Gelatin. Fresh berries or tropical fruits add a refreshing touch.
- Brownies: For chocolate lovers, pairing with fudgy brownies creates a decadent dessert experience. The combination of textures is simply divine!
- Cheesecake Bites: Mini cheesecake bites can add a creamy contrast to the crunchy layers of the gelatin. They’re easy to eat and a crowd favorite.
By pairing your Oreo Chocolate Gelatin with these delightful options, you can create a dessert table that will impress your guests and satisfy every sweet tooth!
Tips for Making the Best Oreo Chocolate Gelatin: An Irresistible Dessert
Creating the perfect Oreo Chocolate Gelatin is all about attention to detail. With a few helpful tips, you can avoid common pitfalls and ensure your dessert turns out delicious every time. Let’s explore some common mistakes to avoid and storage tips to keep your dessert fresh.
Common Mistakes to Avoid
Even the simplest recipes can have their challenges. Here are some common mistakes to watch out for:
- Not Dissolving the Gelatin Properly: Make sure to stir the gelatin in boiling water until it’s completely dissolved. Undissolved granules can lead to a grainy texture.
- Using Expired Ingredients: Always check the expiration dates on your gelatin and cream. Expired ingredients can ruin the flavor and texture of your dessert.
- Layering Too Soon: Allow the chocolate gelatin to cool slightly before layering. Pouring hot gelatin over crushed Oreos can melt them, affecting the texture.
- Skipping the Chilling Time: Patience is key! Chilling the dessert for the full recommended time ensures it sets properly. Cutting into it too early can lead to a messy presentation.
By avoiding these common mistakes, you’ll be on your way to making a stunning Oreo Chocolate Gelatin that everyone will love!
Storage Tips
Proper storage is essential to keep your Oreo Chocolate Gelatin fresh and delicious. Here are some tips to help you:
- Refrigerate Promptly: After preparing your dessert, cover it and place it in the refrigerator as soon as possible. This helps maintain its freshness and prevents any odors from affecting the flavor.
- Use an Airtight Container: If you have leftovers, transfer the dessert to an airtight container. This will help keep it fresh and prevent it from absorbing any unwanted smells.
- Consume Within a Week: For the best taste and texture, enjoy your Oreo Chocolate Gelatin within 5-7 days. After that, the quality may start to decline.
- Avoid Freezing: While it may be tempting to freeze leftovers, it’s not recommended. Freezing can change the texture of the gelatin and make it less enjoyable.
By following these storage tips, you can ensure that your Oreo Chocolate Gelatin remains a delightful treat for days to come!
Breakdown of Time for Oreo Chocolate Gelatin: An Irresistible Dessert
When it comes to making Oreo Chocolate Gelatin, understanding the time involved can help you plan better. Here’s a simple breakdown of the time you’ll need for each step of the process. This way, you can enjoy your dessert without any surprises!
Prep Time
The prep time for Oreo Chocolate Gelatin is quite short. You’ll need about 15-20 minutes to gather your ingredients and prepare the chocolate gelatin. This includes measuring out the ingredients, crushing the Oreo cookies, and layering everything in your dish. It’s a quick and easy process that anyone can manage!
Cooking Time
While there’s no actual cooking involved, the “cooking time” refers to the time it takes for the gelatin to dissolve properly. This step takes about 5 minutes. Just remember to stir well until the gelatin is fully dissolved in the boiling water. After that, you’ll need to let the mixture cool slightly before layering it with the Oreos.
Total Time
The total time for making Oreo Chocolate Gelatin includes both the prep time and the chilling time. After you’ve layered the dessert, it needs to chill in the refrigerator for at least 4 hours. So, while the active time is only about 20-25 minutes, you’ll want to plan for a total of at least 4 hours and 20 minutes, including chilling. If you can wait longer, letting it chill overnight will enhance the flavors even more!
In summary, making Oreo Chocolate Gelatin is a quick and easy process, but the chilling time is essential for the best results. So, gather your ingredients, follow the steps, and get ready to enjoy a delicious dessert that everyone will love!
Nutritional Information for Oreo Chocolate Gelatin: An Irresistible Dessert
Understanding the nutritional information of your dessert can help you enjoy it guilt-free. Oreo Chocolate Gelatin is a delightful treat, but it’s important to know what’s in it. Let’s break down the calories and macronutrients, as well as some health considerations to keep in mind.
Calories and Macronutrients
Here’s a general overview of the nutritional content for one serving of Oreo Chocolate Gelatin, assuming the recipe serves about 8 people:
- Calories: Approximately 200 calories
- Protein: 2 grams
- Fat: 10 grams
- Carbohydrates: 28 grams
- Sugar: 18 grams
These values can vary based on the specific brands of ingredients you use and the portion sizes. The heavy cream and Oreos contribute to the calorie count, while the gelatin adds minimal calories. If you’re looking to reduce calories, consider using lighter alternatives, such as low-fat cream or sugar-free gelatin.
Health Considerations
While Oreo Chocolate Gelatin is a delicious dessert, it’s important to enjoy it in moderation. Here are some health considerations to keep in mind:
- High Sugar Content: With around 18 grams of sugar per serving, this dessert is sweet. If you’re watching your sugar intake, consider reducing the amount of powdered sugar or using sugar substitutes.
- Fat Content: The heavy cream adds richness but also increases the fat content. You can substitute with a lighter whipped topping or use less cream to make it a bit healthier.
- Allergies: Be cautious if you or your guests have allergies. Oreos contain wheat and dairy, so be sure to check for any dietary restrictions.
- Balance with Nutrition: Pairing this dessert with fresh fruit or a light meal can help balance out the indulgence. Fresh berries can add vitamins and fiber, making your dessert experience a bit healthier.
In conclusion, while Oreo Chocolate Gelatin is a delightful treat, being mindful of its nutritional content can help you enjoy it responsibly. With a few adjustments, you can savor this dessert while keeping your health in check!
FAQs about Oreo Chocolate Gelatin: An Irresistible Dessert
Can I make Oreo Chocolate Gelatin ahead of time?
Absolutely! Oreo Chocolate Gelatin is perfect for making ahead of time. In fact, it’s recommended to prepare it a day in advance. This allows the flavors to meld together beautifully and ensures that the gelatin sets properly. Just make sure to cover it well with plastic wrap or a lid to keep it fresh in the refrigerator. Your dessert will be ready to impress when it’s time to serve!
How long does Oreo Chocolate Gelatin last in the fridge?
Oreo Chocolate Gelatin can last in the fridge for about 5 to 7 days. To keep it fresh, store it in an airtight container or cover it tightly with plastic wrap. After this time, the texture and flavor may start to decline, so it’s best to enjoy it within the week. If you notice any changes in smell or appearance, it’s best to discard it.
Can I use sugar-free gelatin for this recipe?
Yes, you can use sugar-free gelatin for Oreo Chocolate Gelatin! This is a great option if you’re looking to reduce sugar intake. Just follow the same instructions for dissolving the sugar-free gelatin in boiling water. Keep in mind that the flavor and sweetness may vary slightly, but it will still be a delicious treat!
What are some alternatives to Oreo cookies?
If you’re looking for alternatives to Oreo cookies, there are plenty of options! Here are a few ideas:
- Chocolate Sandwich Cookies: Any chocolate sandwich cookie will work well in this recipe. Look for brands that offer similar flavors and textures.
- Graham Crackers: For a different twist, crushed graham crackers can add a delightful crunch and a hint of sweetness.
- Homemade Cookies: If you enjoy baking, consider making your own chocolate cookies to use in the layers. This way, you can customize the flavor to your liking.
- Gluten-Free Cookies: For those with gluten sensitivities, there are gluten-free chocolate cookies available that can be used as a substitute.
Feel free to experiment with these alternatives to find the combination that you love best!
Conclusion on Oreo Chocolate Gelatin: An Irresistible Dessert
Final Thoughts on This Delightful Treat
In conclusion, Oreo Chocolate Gelatin is more than just a dessert; it’s a delightful experience that brings joy to any gathering. With its rich chocolate flavor and the satisfying crunch of Oreo cookies, this treat is sure to please everyone. Whether you’re celebrating a special occasion or simply indulging in a sweet craving, this dessert is a fantastic choice.
Making Oreo Chocolate Gelatin is easy and fun. The step-by-step preparation allows you to create a stunning dessert without any baking involved. Plus, the variations and serving suggestions give you the freedom to customize it to your liking. From adding different flavors to pairing it with other desserts, the possibilities are endless!
Remember, the key to a perfect Oreo Chocolate Gelatin lies in the details. Follow the tips provided, and you’ll avoid common mistakes that can affect the texture and flavor. With a little patience during the chilling process, you’ll be rewarded with a beautifully set dessert that looks as good as it tastes.
So, gather your ingredients, invite some friends over, and get ready to impress with this irresistible Oreo Chocolate Gelatin. It’s a dessert that not only satisfies your sweet tooth but also creates lasting memories. Enjoy every delicious bite!
Craving more sweet and indulgent treats? Take a look at these irresistible recipes for your next baking adventure:
- Chocolate Pecan Turtle Clusters: A Decadent Delight
- Chocolate Rice Krispie Balls: Fun and Delicious
- Dark Chocolate Raspberry Pie Bars: A Rich and Fruity Treat
For more delightful recipes and culinary inspiration, follow us on Pinterest!