Introduction to Peanut Butter Chocolate Bars
If you’re a fan of sweet treats, then you’re in for a real delight! Peanut Butter Chocolate Bars are the perfect combination of creamy and crunchy, sweet and salty. These bars are not just a dessert; they are a celebration of flavors that will make your taste buds dance with joy. Whether you’re looking for a quick snack or a dessert to impress your friends, these bars are sure to please.
Why You’ll Love Peanut Butter Chocolate Bars
First and foremost, the taste is simply irresistible. The rich, creamy peanut butter pairs beautifully with the smooth, dark chocolate. Each bite is a heavenly experience! Plus, they are incredibly easy to make. You don’t need to be a master chef to whip up these delicious bars. Just a few simple ingredients and a little bit of time are all you need.
Another reason to love these bars is their versatility. You can enjoy them as a dessert after dinner, a sweet snack during the day, or even as a treat for special occasions. They are perfect for sharing with family and friends, or you can keep them all to yourself—no judgment here!
Moreover, these bars are a no-bake recipe, which means you won’t have to turn on the oven. This makes them a great option for hot days when you want something sweet without heating up your kitchen. Just mix, layer, and chill, and you’re all set!
In summary, Peanut Butter Chocolate Bars are a delightful treat that combines ease of preparation with delicious flavors. They are perfect for any occasion and are sure to become a favorite in your household. So, let’s dive into the ingredients and get started on making these scrumptious bars!
Ingredients for Peanut Butter Chocolate Bars
To create your own batch of Peanut Butter Chocolate Bars, you’ll need a few simple ingredients. These items are easy to find and will help you whip up a delicious treat in no time. Here’s what you’ll need:
- 1 cup creamy peanut butter: This is the star of the show! Choose a smooth variety for easy mixing.
- 1/2 cup honey or maple syrup: This natural sweetener adds a touch of sweetness and helps bind the bars together.
- 2 cups rolled oats: These provide a hearty texture and make the bars more filling.
- 1/2 cup dark chocolate chips: Rich and decadent, these will melt beautifully for the topping.
- 1/4 cup coconut oil: This helps to melt the chocolate and gives it a smooth finish.
- 1/2 teaspoon vanilla extract: A splash of vanilla enhances the overall flavor of the bars.
- Pinch of salt: Just a little salt balances the sweetness and brings out the flavors.
Feel free to adjust the ingredients based on your preferences. For instance, if you like a sweeter bar, you can add a bit more honey or maple syrup. If you prefer a crunchier texture, consider adding some chopped nuts or seeds. The beauty of this recipe lies in its flexibility!
Now that you have your ingredients ready, let’s move on to the next step: preparing the Peanut Butter mixture!
Step-by-Step Preparation of Peanut Butter Chocolate Bars
Now that you have all your ingredients ready, it’s time to dive into the fun part—making your Peanut Butter Chocolate Bars! Follow these simple steps, and you’ll have a delicious treat in no time.
Step 1: Gather Your Ingredients
Before you start, make sure you have everything you need. Gather your peanut butter, honey or maple syrup, rolled oats, dark chocolate chips, coconut oil, vanilla extract, and a pinch of salt. Having everything in one place will make the process smoother and more enjoyable. Plus, it’s always nice to see all your ingredients laid out!
Step 2: Prepare the Peanut Butter Mixture
In a large mixing bowl, combine the creamy peanut butter and honey or maple syrup. Use a spatula or a wooden spoon to mix them together until they are well blended. The mixture should be smooth and creamy. If you want to add a pinch of salt, now is the time! This little addition will enhance the flavors and make your bars even more delicious.
Next, add the rolled oats to the peanut butter mixture. Stir until the oats are fully coated. This will give your bars a hearty texture and make them more filling. Make sure there are no dry oats left; everything should be well combined.
Step 3: Melt the Chocolate
Now, it’s time to melt the chocolate! In a small saucepan, combine the dark chocolate chips and coconut oil. Heat them over low heat, stirring constantly. This will help the chocolate melt evenly without burning. If you prefer, you can also melt the chocolate in the microwave. Just place the chocolate and coconut oil in a microwave-safe bowl and heat in 30-second intervals, stirring in between until smooth.
Step 4: Combine and Layer
Once your chocolate is melted and smooth, it’s time to layer! Take a square baking dish (about 8×8 inches) and line it with parchment paper. This will make it easier to remove the bars later. First, pour the peanut butter and oat mixture into the dish. Press it down firmly with your hands or a spatula to create an even layer.
Next, pour the melted chocolate over the peanut butter layer. Use a spatula to spread it evenly across the top. Make sure every corner is covered with that rich, dark chocolate. This is where the magic happens!
Step 5: Chill and Set
Now that your bars are layered, it’s time to chill them. Place the baking dish in the refrigerator for at least 2 hours. This will allow the chocolate to set and the bars to firm up. Once they are chilled, you can cut them into squares or bars, depending on your preference.
After chilling, remove the bars from the dish using the parchment paper. Cut them into your desired size and enjoy! These Peanut Butter Chocolate Bars are perfect for snacking or as a sweet treat after a meal.
And there you have it! A simple, step-by-step guide to making your very own Peanut Butter Chocolate Bars. Now, let’s explore some fun variations you can try!
Variations of Peanut Butter Chocolate Bars
While the classic Peanut Butter Chocolate Bars are already a delightful treat, there are many ways to customize them to suit your taste. Let’s explore some fun variations that can take your bars to the next level!
Adding Nuts or Seeds
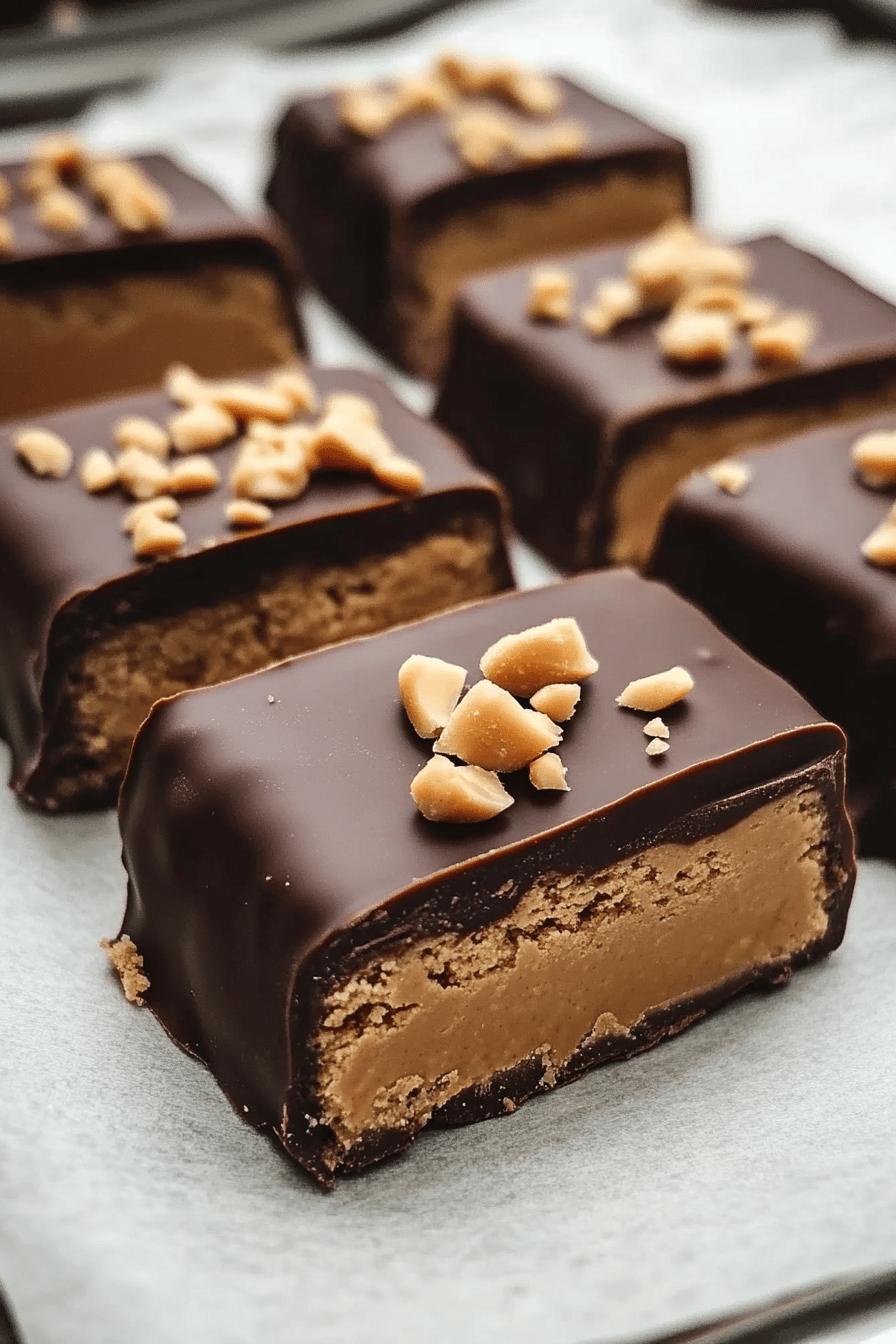
One of the easiest ways to enhance your Peanut Butter Chocolate Bars is by adding nuts or seeds. Nuts like almonds, walnuts, or pecans can add a satisfying crunch and extra flavor. Simply chop them coarsely and mix them into the peanut butter mixture before layering. You can also sprinkle some on top of the melted chocolate for an appealing finish.
If you prefer seeds, consider adding chia seeds or sunflower seeds. These tiny powerhouses are packed with nutrients and can give your bars a delightful texture. Just a handful mixed into the peanut butter will do the trick. Not only do they add crunch, but they also boost the nutritional value of your bars!
Using Different Types of Chocolate
Another fun variation is to experiment with different types of chocolate. While dark chocolate is rich and delicious, you can also try milk chocolate or even white chocolate for a sweeter taste. Each type of chocolate will bring its unique flavor profile to the bars.
If you’re feeling adventurous, consider mixing chocolates! For example, you can create a marbled effect by swirling melted dark and white chocolate together on top of the peanut butter layer. This not only looks beautiful but also adds a delightful mix of flavors in every bite.
Feel free to get creative! The beauty of these Peanut Butter Chocolate Bars is that they are versatile and can be tailored to your liking. Whether you add nuts, seeds, or different chocolates, each variation will bring something special to the table. Now, let’s move on to some important cooking notes to keep in mind while making these bars!
Cooking Note for Peanut Butter Chocolate Bars
When making Peanut Butter Chocolate Bars, there are a few cooking notes to keep in mind to ensure your bars turn out perfectly every time. These tips will help you avoid common pitfalls and enhance your overall baking experience.
First, always use high-quality ingredients. The flavor of your bars largely depends on the quality of the peanut butter and chocolate you choose. Opt for natural peanut butter without added sugars or oils for the best taste. Similarly, select dark chocolate that you enjoy eating on its own, as this will elevate the flavor of your bars.
Next, be mindful of the consistency of your peanut butter. If your peanut butter is too thick, it may be challenging to mix with the other ingredients. If needed, you can warm it slightly in the microwave for a few seconds to make it easier to blend. Just be careful not to overheat it!
Additionally, when melting chocolate, patience is key. Whether you’re using a stovetop or microwave, heat the chocolate slowly and stir frequently. This will help prevent burning and ensure a smooth, glossy finish. If you notice any lumps, continue stirring until fully melted.
Lastly, remember to let your bars chill long enough. While it may be tempting to cut into them early, allowing them to set for at least two hours in the refrigerator will give you the best texture. If you’re in a hurry, you can place them in the freezer for about 30 minutes, but keep an eye on them to avoid freezing solid.
By following these cooking notes, you’ll be well on your way to creating delicious Peanut Butter Chocolate Bars that are sure to impress. Now, let’s explore some serving suggestions to enjoy these delightful treats!
Serving Suggestions for Peanut Butter Chocolate Bars
Once your Peanut Butter Chocolate Bars are ready, it’s time to enjoy them! These bars are not only delicious but also versatile, making them perfect for various occasions. Here are some serving suggestions to elevate your experience:
- As a Snack: Enjoy these bars as a quick snack during the day. They are perfect for a mid-afternoon pick-me-up or a post-workout treat. Just grab a bar and go!
- With a Glass of Milk: Pair your Peanut Butter Chocolate Bars with a cold glass of milk. The creamy texture of the milk complements the rich flavors of the bars beautifully.
- On a Dessert Platter: If you’re hosting a gathering, consider serving these bars on a dessert platter. Cut them into bite-sized pieces and arrange them alongside other treats like cookies or brownies for a delightful dessert spread.
- With Fresh Fruit: Serve your bars with fresh fruit like strawberries, bananas, or apple slices. The freshness of the fruit balances the richness of the bars, creating a well-rounded snack.
- Drizzled with Extra Chocolate: For an extra indulgent treat, drizzle some melted chocolate over the top of your bars before serving. This adds a beautiful presentation and enhances the chocolate flavor.
- As a Gift: Wrap your Peanut Butter Chocolate Bars in decorative paper or place them in a cute box to give as a gift. They make a thoughtful and delicious present for friends and family!
These serving suggestions will help you enjoy your Peanut Butter Chocolate Bars in various delightful ways. Whether you’re snacking alone or sharing with others, these bars are sure to bring smiles and satisfaction. Now, let’s move on to some tips for making the perfect Peanut Butter Chocolate Bars!
Tips for Perfect Peanut Butter Chocolate Bars
Creating the perfect Peanut Butter Chocolate Bars is all about attention to detail and a few handy tips. With these suggestions, you can ensure that your bars turn out delicious every time. Let’s dive into some essential tips that will elevate your baking game!
- Measure Accurately: Precision is key in baking. Use measuring cups and spoons to ensure you have the right amounts of each ingredient. This will help maintain the balance of flavors and textures in your bars.
- Choose the Right Peanut Butter: The type of peanut butter you use can significantly affect the outcome. Opt for creamy, natural peanut butter without added sugars or oils. This will give your bars a smooth texture and rich flavor.
- Mix Thoroughly: When combining the peanut butter mixture with the oats, make sure to mix thoroughly. This ensures that every bite is packed with flavor and that the oats are evenly distributed throughout the bars.
- Use Parchment Paper: Lining your baking dish with parchment paper is a game-changer. It makes it easy to lift the bars out once they’re set, allowing for clean cuts and a beautiful presentation.
- Let Them Chill: Patience is essential! Allow your bars to chill for at least two hours in the refrigerator. This helps them firm up and makes cutting them into neat squares much easier.
- Experiment with Toppings: Don’t be afraid to get creative with toppings! Consider adding a sprinkle of sea salt, crushed nuts, or even a drizzle of caramel for an extra layer of flavor.
- Store Properly: To keep your bars fresh, store them in an airtight container in the refrigerator. They can last up to a week, making them a perfect make-ahead treat!
By following these tips, you’ll be well on your way to making Peanut Butter Chocolate Bars that are not only delicious but also visually appealing. Now that you have the tools for success, let’s break down the time it takes to make these delightful bars!
Breakdown of Time for Peanut Butter Chocolate Bars
Understanding the time it takes to make Peanut Butter Chocolate Bars can help you plan your baking session better. Here’s a simple breakdown of the time involved in each step of the process.
Prep Time
The prep time for these delicious bars is quite minimal. You’ll need about 15 minutes to gather your ingredients and prepare the peanut butter mixture. This includes measuring out the ingredients and mixing them together. It’s a quick and easy process that anyone can manage!
Cooking Time
Since this is a no-bake recipe, the cooking time is essentially the time spent melting the chocolate. This will take around 5 to 10 minutes, depending on your method. Whether you choose to melt the chocolate on the stovetop or in the microwave, it’s a fast step that adds a rich layer to your bars.
Total Time
In total, you can expect to spend about 20 to 25 minutes actively preparing your Peanut Butter Chocolate Bars. However, don’t forget to factor in the chilling time! You’ll need to let the bars chill in the refrigerator for at least 2 hours to set properly. So, while the active time is short, the total time from start to finish is around 2 hours and 25 minutes. This includes both preparation and chilling time.
With this time breakdown, you can easily fit making these bars into your day. They are perfect for a quick treat or a fun baking project with family. Now that you know how long it takes, let’s move on to the nutritional information for these delightful bars!
Nutritional Information for Peanut Butter Chocolate Bars
Understanding the nutritional content of your Peanut Butter Chocolate Bars can help you enjoy them guilt-free. These bars are not only delicious but also packed with nutrients that can provide energy and satisfaction. Here’s a breakdown of the key nutritional information for one serving of these delightful bars:
Calories
Each Peanut Butter Chocolate Bar contains approximately 200 calories. This makes them a great option for a sweet treat without going overboard. The combination of peanut butter and oats provides a good balance of energy, making them perfect for a snack or dessert.
Protein
These bars are a good source of protein, with about 6 grams per serving. The creamy peanut butter contributes significantly to this protein content, helping to keep you feeling full and satisfied. This makes them an excellent choice for a post-workout snack or a mid-afternoon pick-me-up!
Sodium
In terms of sodium, each bar contains around 100 milligrams. This is a moderate amount, especially considering the overall nutritional benefits. If you’re watching your sodium intake, you can opt for unsalted peanut butter to reduce the sodium content even further.
Overall, Peanut Butter Chocolate Bars are a nutritious and satisfying treat. They provide a good mix of calories, protein, and flavor, making them a delightful addition to your snack repertoire. Now that you know the nutritional information, let’s address some frequently asked questions about these delicious bars!
FAQs about Peanut Butter Chocolate Bars
Can I use natural peanut butter for this recipe?
Absolutely! You can use natural peanut butter for your Peanut Butter Chocolate Bars. Just make sure to choose a variety that is smooth and free from added sugars or oils. Natural peanut butter will give your bars a rich flavor and creamy texture. Just remember that natural peanut butter can sometimes be a bit thicker, so you may need to mix it well to achieve a smooth consistency.
How long do Peanut Butter Chocolate Bars last?
Your Peanut Butter Chocolate Bars can last up to a week when stored properly. Keep them in an airtight container in the refrigerator to maintain their freshness. If you want to enjoy them later, you can also freeze them. Just make sure to wrap them well to prevent freezer burn!
Can I freeze Peanut Butter Chocolate Bars?
Yes, you can freeze Peanut Butter Chocolate Bars! To freeze, cut them into squares and wrap each piece in plastic wrap or aluminum foil. Place them in a freezer-safe container or bag. They can last for up to three months in the freezer. When you’re ready to enjoy them, simply thaw them in the refrigerator or at room temperature.
What can I substitute for chocolate in this recipe?
If you want to substitute chocolate in your Peanut Butter Chocolate Bars, there are a few options. You can use carob chips for a caffeine-free alternative. Another option is to use a chocolate-flavored protein powder mixed with a little coconut oil to create a chocolate-like topping. Just keep in mind that the flavor and texture may vary slightly, but it can still be delicious!
Conclusion on Peanut Butter Chocolate Bars
In conclusion, Peanut Butter Chocolate Bars are a delightful treat that combines the rich flavors of creamy peanut butter and smooth dark chocolate. They are not only easy to make but also versatile, allowing you to customize them to suit your taste. Whether you enjoy them as a quick snack, a dessert after dinner, or a sweet gift for friends, these bars are sure to impress.
With simple ingredients and a straightforward preparation process, anyone can whip up a batch of these delicious bars. Plus, the no-bake aspect makes them perfect for warm days or when you want to avoid turning on the oven. The variations you can try, such as adding nuts or using different types of chocolate, only enhance their appeal.
Remember to follow the cooking notes and tips provided to ensure your bars turn out perfectly every time. From measuring accurately to letting them chill long enough, these small details can make a big difference in the final product. And with the nutritional information in mind, you can enjoy these bars guilt-free, knowing they provide a good source of protein and energy.
So, gather your ingredients, follow the steps, and treat yourself to these scrumptious Peanut Butter Chocolate Bars. They are bound to become a favorite in your household, bringing joy and satisfaction with every bite. Happy baking!